The Notes Add-On simplifies note taking for students and provides an effective way for instructors to offer timely feedback. This intuitive toolset enables students to jot down notes while studying and allows instructors to respond asynchronously, creating a reliable and flexible communication workflow.
What’s New in Version 2.0 #
- Modernized Interface: Updated design aligns with LearnDash’s latest UI standards.
- Accessibility Improvements: Better screen reader support, color contrast, and form clarity.
- Improved Note Pop-Up Icon: Now starts in the top-right corner, scales better, and remembers user placement.
- Collapsed Note Form: The “Add New Note” form is now minimized by default to reduce visual clutter.
- Updated Styling for Notes Lists and Replies: Easier to scan, with clearer distinctions between user and instructor responses.
Installation #
You can download the Notes Add-on plugin from account.learndash.com. You can log in to your account, download Notes, and follow the installation instructions below.
To Install Notes: #
- Download the Notes Add-On plugin from your account at account.learndash.com
- In your WordPress dashboard, go to Plugins > Add New
- Click Upload Plugin
- Select the downloaded
.zipfile - Click Install Now
- Click Activate Plugin
Settings #
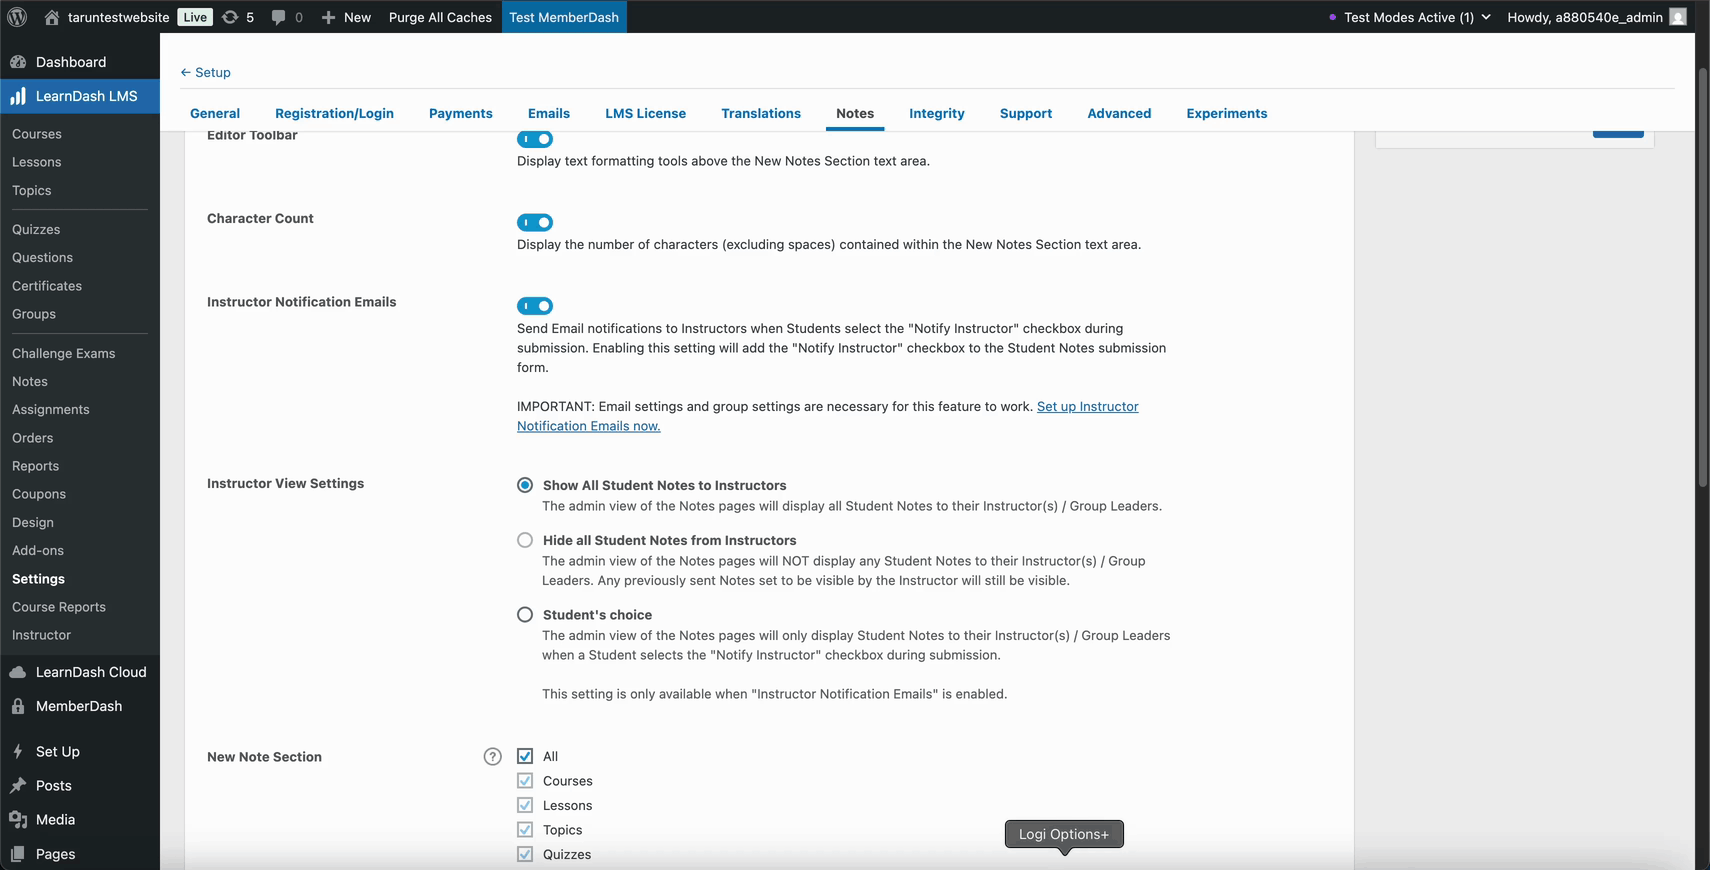
To access the Notes global settings:
- Navigate to LearnDash LMS > Notes > Settings
- You will see Settings, Labels, Styling, Email and How To
How To #
Under this section, you will find the shortcodes needed to add Notes to your courses. You will also find instructions on how to add a Notification icon which you can add if you choose to use the Instructor Notification feature.
| Block | Shortcode | Description |
|---|---|---|
| Notes Shortcodes | ||
| Add a Note | [llms_add_new_note] | Displays the Add New Note form on the page or post content. |
| Add a Pop-Up Note | [llms_add_new_note_popup] | Displays the Add New Note icon, which can be moved around the page. When clicked, it will open a New Note. |
| Notes List | [llms_notes_list] | Displays the users previous notes in that post or page. |
| Full Notes List | [llms_full_notes_list] | Displays the history of all the users notes in one location. |
If you use the Instructor Notification feature, consider adding a Notifications icon to your menu bar to notify the user when the instructor has responded to a Note.
To create this menu item in your website header, perform the following:
- Navigate to your dashboard > Appearance > Menus > Select the menu to which you want to add the icon
- Click the Custom Links menu item in your Add menu items column
- Add the link to the URL field for the page containing the
[llms_full_notes_list]shortcode - Give this menu item a Navigation label (i.e., Link Text) to be displayed when hovering over the icon with a mouse cursor
- Click on the Add to Menu button to add this to the bottom of your menu
- Click on the down arrow of this menu item to open its properties
- Add
llmssn-bell-iconinto the CSS Classes (optional) field - If this field does not show, enable it by clicking Screen Options at the top of your screen and checking the box for CSS Classes
- Collapse this menu item and drag it to your desired location in the menu
- Click on the Save Menu button to complete this operation
- Once completed, you can visit the Styling tab found under LearnDash LMS > Notes > Styling to change the default icon and color
Settings #
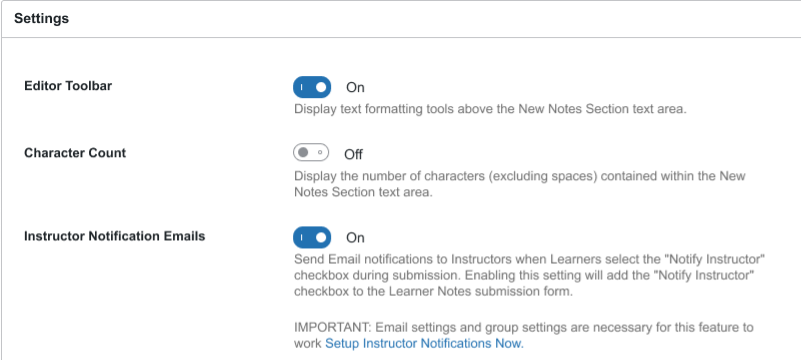
Here is where you can enable/disable specific global settings for Notes. Below is a list of all the settings you have available.

- Editor ToolBar: Enable this feature to make an Editor Toolbar available for your users
- Character Count in rich text area: Enable this feature to include a character count for your users
- Instructor Notification: Enable this feature if you would like your users to be able to send a note to their instructor
Regarding the Instructor Notification setting: You will need to create a Group, assign a Group Leader, and set up the emails for Instructor Notifications to work. The Group Leader will be the only one who will receive the notifications from the users within that Group and can respond to the notes.
You have several options for controlling the automatic visibility of Notes-related shortcodes within your course content. These settings allow you to customize how these Notes features are displayed to learners. Lets explore each shortcode feature setting and its visibility options:
- Automatically include the
[llms_add_new_note]shortcode when viewing Course content: Enable this feature if you would like the Add New Note added to every Course page automatically

- Automatically include the
[llms_add_new_note_popup]shortcode when viewing Course content – Enable this feature if you want the Add New Note Pop-Up added to every Course page automatically

- Visibility options checkboxes:
- All: Enable the pop-up for all course content.
- Specific Content Types: Choose relevant checkboxes for Lessons, Topics, and Quizzes to restrict the pop-up to specific content types.
- Automatically include the
[llms_notes_list]shortcode when viewing Course content: Enable this feature if you would like the Notes List added to every Course page automatically
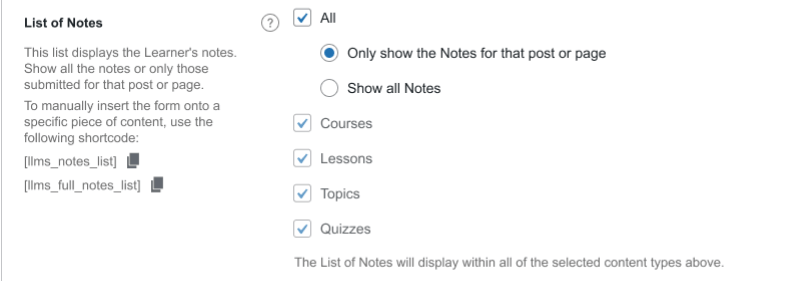
- Visibility options checkboxes:
- All: Display the Notes List for all course content.
- Specific Content Types: Check the boxes for Lessons, Topics, and Quizzes.
- Automatically include the
[llms_full_notes_list]shortcode when viewing Course content – Enable this feature if you would like the Full Note List added to every Course page automatically

Visibility options checkboxes:
- All: Show the Full Note List for all course content.
- Specific Content Types: Specify content types by selecting checkboxes for Lessons, Topics, and Quizzes
- Allow Instructors the ability to view Notes that were not sent to them: By default, Instructors will only have the ability to view Notes sent directly to them. However, you can enable this feature to see ALL notes from your users even if they do not send them to the instructor

Labels #
Labels let you customize how you refer to the notes on your site. For example, if you want to call your notes journal entries or rename instructor to Teacher, you may customize the labels to fit your needs. When you apply a custom label, all references to that label will change on the front end of your site so your users will see the new label(s).

The following LearnDash labels are available for customization:
- Type note title
- Sum of Characters
- Notify Instructor
- Instructor was notified
- Note Added Successfully
- No Notes Added
- Added
- Submit
- My Historical Notes
- All My Notes
- No Notes Added Anywhere
- Delete
- Note Deleted
- Are you sure? This can not be undone.
- Download
- Related
- Open
Styling #
The Styling section is for those who would like to customize the icons utilized throughout the Notes Add-on. For example, if you choose to use pop-up notes, switching the window icon to another icon may suit your needs. You can also customize the color to match your sites color palette.

Click here to view and select Font Awesomes Free Icon library.
Email #
Lastly, you can set up and customize the emails the user and instructor will receive when you use the Instructor Notification feature.
NOTE Youll need to make sure a subject and email Body is added to BOTH the Instructor and user emails for the Instructor Notification feature to work correctly.
Adding Notes to Your Courses #
You can add Notes to your courses in two ways: #
- Globally, by enabling the Note shortcode (either the Add New Note or Note Pop-Up) automatically to all course content
- Manually, by copying and pasting the Note shortcode (either the Add New Note or Note Pop-Up) to each specific page (i.e., Lesson, Topic, Quiz, or any page within your WP site)
Automatically Add Notes #
Go to LearnDash LMS > Notes > Settings. Next, toggle on either Automatically include the [llms_add_new_note] shortcode when viewing course content or, automatically include the [llms_add_new_note_popup] shortcode when viewing course content (or toggle both on if you’d prefer)
Manually Add Notes #

- Navigate to LearnDash LMS > Notes > Settings > How To
- Copy the Notes shortcode you wish to do (Add New Notes or Note Pop-Up)
- Go directly to the page you want to add the note (i.e., Lesson > Click on specific Lesson)
- Once inside the specific page, search for the Shortcode Block, select the block and paste the shortcode into the block. Then, click update
- Repeat this step for any page/post you wish to include Notes
Instructor Notification Emails #
Instructor Notifications are an excellent way for users to communicate via Notes with their instructors. Users can create a note and send it directly to their Instructor (Group Leader) and receive a response from the instructor via email and Notes notifications whenever they are logged in.
For Instructor Notifications to work, you will need to have the following set up:
- Create a Group, and assign a Group Leader. The course must belong to a Group, and the user must be enrolled in that Group.
- Enable the Instructor Notifications feature under LearnDash LMS > Notes > Settings.
- Set up the Emails with a Subject line and email body for both the instructor and user.
Responding to a Users Note #
The Instructor (Group Leader) will receive an email notification when a user has sent a Note, and they can view and respond to the note in their dashboard.

To view and respond to a note:
- Log in and go to LearnDash LMS > Notes
- Click Respond on the latest note
- Review the note
- Check to Notify Leaner if you wish the user to receive an email notification
- Type in your response in the message body > Click Update to respond