The LearnDash Zapier integration empowers you to automate the learning experience. Using Zapier, you can connect LearnDash with over 1,500 applications, and automatically pass data from LearnDash to another application of your choice.
Data is sent to another app after specific Triggers take place on your LearnDash site. We’ll briefly explain how Zapier works, all of the available Triggers, and walk you through a real-world example from start to finish.
NOTE: You need to sign up for a Zapier account before you can use this integration. Both free and premium options are available. Note that some Zapier functionality, such as filters, require a paid plan.
What is a Zap? #
A Zap is a connection between two (or more) applications. Zaps consist of one Trigger, followed by one (or several) Actions.
- Trigger: Something occurs in Application 1 to start the process. In this case, Application 1 is LearnDash.
- Data from Application 1 is sent to Zapier
- Filter: Modify the data in one, or several, ways (optional, requires premium account)
- Action: Some, or all, of the data is then sent to Application 2
Sign Up for a Zapier Account #
- Go to zapier.com and click the “Sign Up” button at the top
- Follow the prompts to create your account
Keep your account open in your browser, as we’ll come back to it shortly.
Install the Zapier Integration #
Option 1: Add-ons Menu (requires an active LearnDash license) #
- In your WordPress admin area, navigate to LearnDash LMS > Add-Ons
- Locate the Zapier for LearnDash add-on
- Click Install Now
- Click the Activate Plugin button

Option 2: Manual Upload #
- Download the plugin file (must be logged in to download)
- In WordPress, navigate to Plugins > Add New
- Click Upload Plugin
- Browse for the
.zipfile you downloaded in Step 1 - Click Install Now
- Click Activate Plugin
Supported Triggers & Actions #
As of version 2.0 of the LearnDash Zapier integration, we support the following triggers and actions. Over time, we will look to expand upon these based on feedback.
Triggers #
- Enrolled into course
- Enrolled into a group
- Group completed
- Course completed
- Lesson completed
- Topic completed
- Quiz Taken
- Quiz completed
- Essay submitted
Actions #
- Add user to a course
- Remove user from a course
- Add user to a LearnDash Group
- Remove user from a LearnDash Group
Now it’s time to set up a new zap.
The Trigger: When This Happens… #
- Login to your zapier.com account
- Click the Make a Zap! button in the top-right corner

- Give your Zap a name (for internal use only)

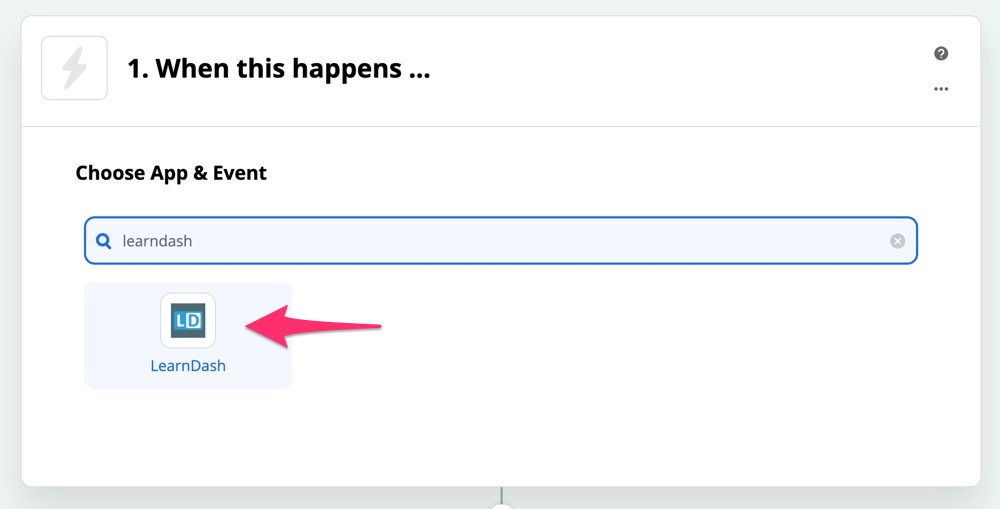
- Under Choose App & Event, search for “learndash” and click on the LearnDash app that appears
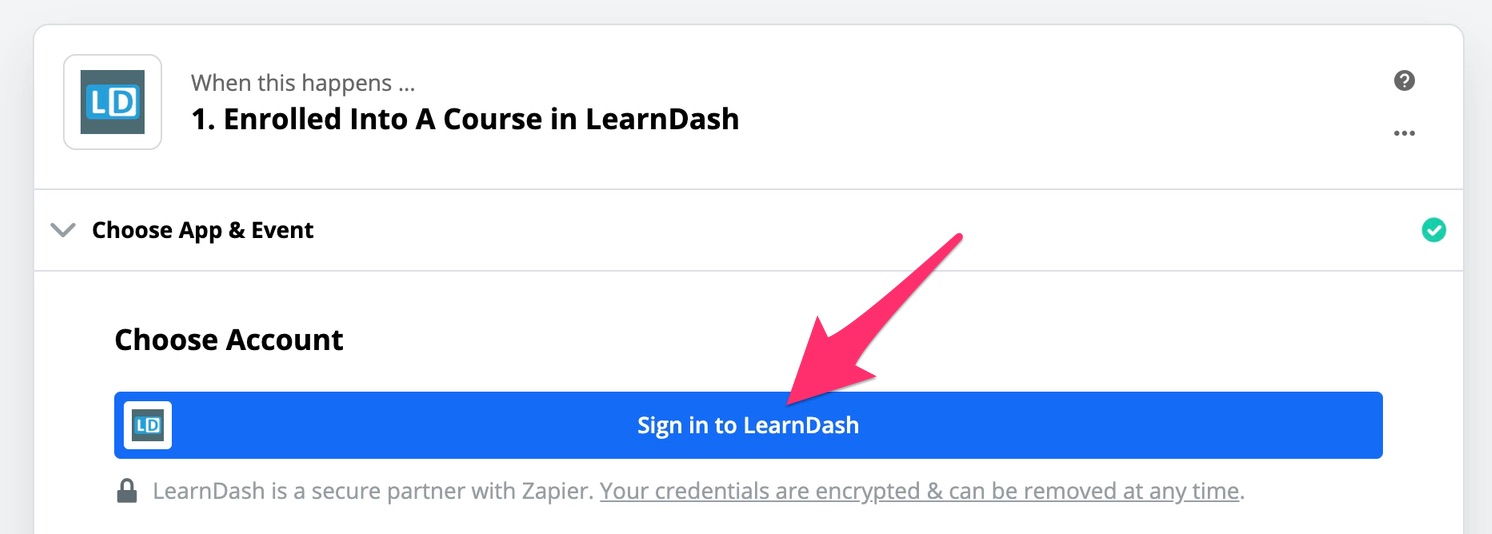
- Under Choose Trigger Event, select one of the triggers from the list, and then click Continue

- Click the Sign in to LearnDash button
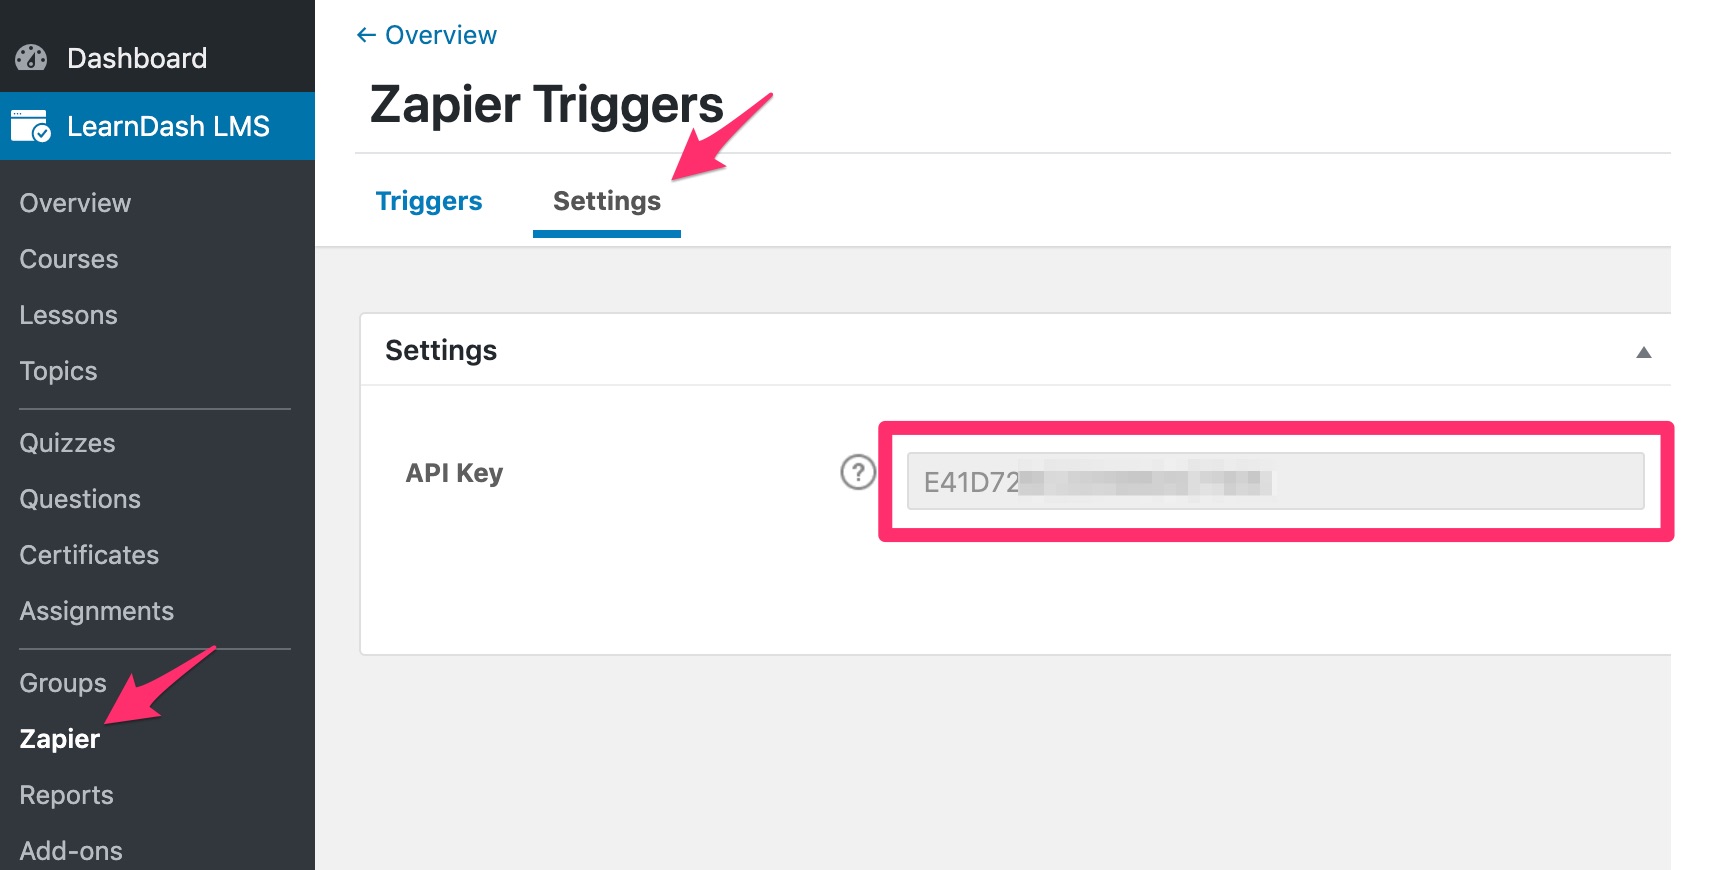
- A popup window will appear, asking you for your site’s URL and an API key
- Head back to your WordPress dashboard and go to LearnDash LMS > Zapier > Settings, and copy your API key
The Action: Do This… #
- Go back to the Zapier popup window to enter your site URL and the API key you just copied. Click Yes, Continue.
NOTE: When entering your site URL, be sure to include the final forward-slash (/) at the end.

- Click the large Continue button to move onto the next step.

- You have three options when it comes to testing your connection and your site’s associated data:
- Skip the test
- Test and review the results
- Test and continue setting up your Zap

- If you test and review, you’ll see an example of your data, based on the trigger event you chose.
- If your connection has been set up properly, you’ll see a green checkmark next to the trigger.

NOTE: When entering your site URL, be sure to include the final forward-slash (/) at the end.
- Click on the 2. Do this … heading
- Search for and choose an app from the list

- In the Choose Action Event dropdown, search for and select an action.
NOTE: The actions will vary based on which app you choose.
- Click Continue
- You’ll now be asked to sign into your Mailchimp account (or connect to whatever app you chose in step 2 above).

- Follow the instructions in the popup to login & authorize access to your account.
NOTE: This will look different depending on the app you choose to connect with.
- You should see your connection listed in the dropdown box. Then click theContinue button.

- You’ll then be asked to customize the details that will be sent to Mailchimp (or whatever app you choose). This will vary greatly, depending on the app. Here’s an example of the Mailchimp fields:

- Fill in all the required fields to take the appropriate action(s) you want to take.
NOTE: If you’re sending an email address from LearnDash to another application, be sure to use the dynamic User Data User Email field. Do not type an email address in the email field.
- When you’re finished filling in all the fields, click Continue.
- Once again, you have 3 options for testing the data:
- skip the test
- test & review the data
- test & continue with the zap

- If your test is successful, you’ll see a message like this:

You can also check your Mailchimp account and you will see a test subscriber has been added to the audience list you chose. - Then click Done Editing to finish up your zap.
- Finally, make sure you turn your zap on. You should see a toggle at the very bottom of the screen. Click the switch to turn it from OFF to ON.

- The message will disappear and you should see a green ON switch in the top-right corner. Your zap should start to work immediately.

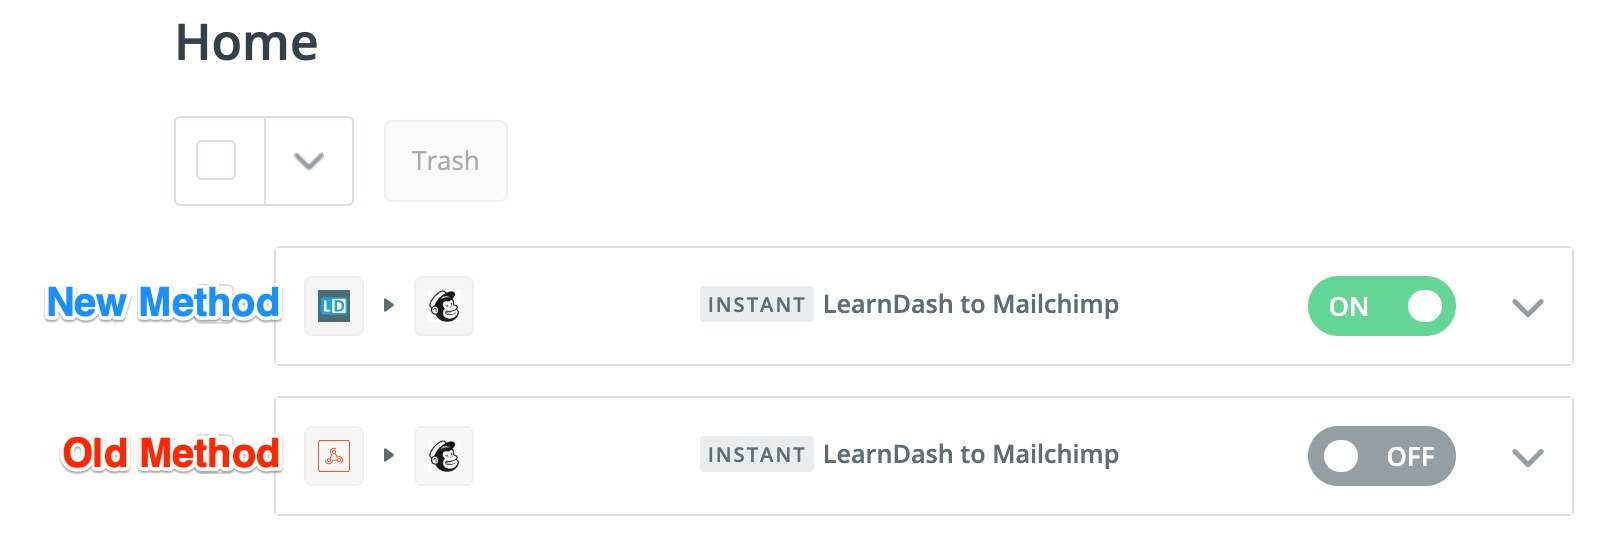
LearnDash Zaps vs. Webhook Zaps #
Any zaps you set up using the older method (webhooks) will continue to work, but we recommend using the official LearnDash app in Zapier moving forward. If you need to distinguish between the two types in your Zapier account, just look at the icon used for the trigger. Old zaps will have red/orange webhook symbol while using the newer method will have the blue “LD” icon.
Legacy Zapier Setup (v1.x) #
IMPORTANT: This is the old way to connect LearnDash to Zapier prior to Version 2.0 of the Zapier add-on. We do not recommend this method.
Before we set up any connections in LearnDash, we need to start creating our Zap on the Zapier website.
Create a Trigger #

- Navigate to zapier.com
- Click the Make a Zap! button in the top-right corner
- Give your Zap a name (for internal use only)
- Choose a Trigger App: Select Webhooks
- Choose the Catch Hook option
- Click Save + Continue

Copy the Webhook URL to your clipboard. You’ll need it in just a second.

Set Up the Zap in LearnDash #

- Navigate to LearnDash LMS > Zapier
- Click Add Trigger
- Give your Trigger a name (internal use only)
- Trigger Event: Choose Enrolled into course
- Trigger Course: Choose a specific course, or leave it set to All Courses
- Webhook URL: Paste the Webhook URL you copied from Zapier
- Click Publish
NOTE: You can choose any of the available Trigger Events from the list. We’re just using Enrolled into course for this example.
Available LearnDash Event Triggers #
You may use any of the following events to initiate an Action step in Zapier:
- User enrolls into a course
- User completes a course
- User completes a lesson
- User completes a topic
- User completes a quiz
- User passes a quiz
- User fails a quiz
- User submits an essay
Zapier also works with WooCommerce, and there are several WooCommerce Triggers available as well.
Send Test Data to Zapier #
In order for Zapier to know what data to send to Mailchimp, we need to create a test user, and perform the action of enrolling that user into a course.
NOTE: The action that you need to perform on your LearnDash site will depend on the Trigger Event that you choose. Whatever event you choose, be sure to perform that specific action.
Create a Test Course #
Let’s create a simple test course that we can enroll in. You can delete this course after you’ve used it to set up the Zapier integration.
- Navigate to LearnDash LMS > Courses
- Click Add New
- Give your course a title
- On the Settings tab, set the Access Mode to Free
- Click Publish
We don’t need to add any lessons or other content. We just need a course that we can easily enroll in.
Create a Test User #
Now we need a user to enroll in our test course. Since administrators are automatically enrolled in all courses, let’s create a test user. Again, you can delete this test user after you’re finished the setup.
- Navigate to Users > Add New
- Fill out the required information
- Role should be set to Subscriber
- Click Add New User
Now you’ll need to either logout of your WordPress administrator account or use a private browsing session to login as this new test user.
Perform the Test Action #
- Navigate to the course page of the test course you just created
- Click the Take this Course button
Now that you are enrolled in the course, you have sent Zapier the information it needs to be able to communicate with Mailchimp.
Finalize the Trigger #
You just need to confirm with Zapier that it has the correct information.
- Navigate back to your Zapier account
- Click the OK, I did this button
- Under Pick A Sample To Set Up Your Zap, you should have one example. Select it.
TIP: Click the dropdown arrow to reveal the information that Zapier collected about the course & the user. This will confirm that you have the info you need.
- Click Continue

Create an Action Step #
Now it’s time to tell our Zap what to do once the Trigger has been fired.


- If you’re not automatically sent to the Choose an Action App screen, click the + Add a Step button
- Click on Action/Search
- Type “mailchimp” into the search bar, and click on Mailchimp when you see it appear
- Select Mailchimp Action: Choose Add/Update Subscriber
- Click the Connect an Account button. A new window will ask you to sign into your Mailchimp account.
- Make sure your account is selected, then click Save + Continue
- Audience (formerly Lists): Choose the audience in which you’d like to add the new subscriber to
- Subscriber Email: Type “email” to search, and select the option for User[user Email]
IMPORTANT: Do not type an actual email address is this field.
- All other fields are optional, but you may set them up if you’d like
- Click the Continue button
- Click the Send Test to Mailchimp button
- Click Finish
- Click the toggle to turn on your Zap
Additional Options #
If you have a premium Zapier account, you can add more than 1 Action step. This allows you to filter and reformat a user’s data before adding it to Mailchimp (or another app of your choosing).
Learn more about filtering and advanced options in Zapier’s help docs.
Zap Ideas #
Here are just a few ideas for how to use Zapier with LearnDash to better automate your learning experience.
- Course Enrollment Email List
When a user enrolls into a course, add them to your email list - Course Enrollment CRM
When a user enrolls into a course, add them to your CRM database - Course Enrollment Help Desk Software
When a user enrolls into a course, create an account for them in your help desk software - Quiz Data Spreadsheet
Keep track of passed and/or failed quizzes by adding them to a spreadsheet (Google Sheets, Microsoft Excel, and others) - Completed Lessons/Topics Slack
Post a message to a Slack channel when users complete lessons/topics - Course Completed Email
Send an email to users and/or admins whenever a course (all courses, or a specific course) is completed - Course Completed Tag or Custom Field
After a user completes a specific course, apply a tag or set a custom field in your CRM - WooCommerce Subscription Fails SMS
If you’re using WooCommerce subscriptions, you can send yourself a text message when a subscription renewal fails
FAQ #
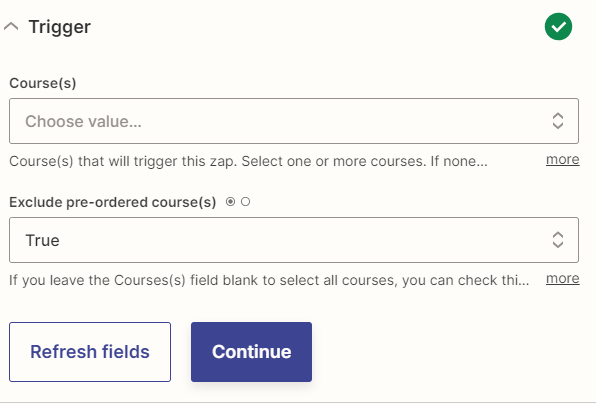
Can I exclude pre-ordered courses from triggering Enrolled Into Course zaps?
Yes, you can exclude pre-ordered courses. You’ll want to set the exclude pre-ordered course(s) field to “true”.
Will the Enrolled into course Trigger work with course access mode set to Open?
No. The course access mode cannot be set to Open when using the Enrolled into course Trigger.
How to Modify Payload Data Before Being Sent to Zapier?
You can add any additional data such as user meta data, course meta data, etc., to the payload before being sent to Zapier using filter hook learndash_zapier_api_payload.
Here is an example:
add_filter( 'learndash_zapier_api_payload', function( $payload, $subscription, $trigger ) {
    if ( isset( $payload['user'] ) ) {
        $payload['user']->custom_data = 'abc123';
    }

    return $payload;
}, 10, 3 );
I get an authentication error when connecting my LearnDash account to Zapier. What should I do to fix this?
The authentication error usually comes from a conflict with caching or a security plugin that blocks our URL query endpoint. You can try whitelisting our URL query endpoint at site.com/?learndash-integration=zapier in your caching or security plugin settings.