
Table of Contents
Managing Organizations and Teams from the Front-End
In our Group Leaders doc, we explained that “Group Leader” is a WordPress user role that allows you to add a user as a Lead Organizer (for Organizations) or a Team Leader (for Teams). These users are now able to manage the Organization/Team in ways that regular team members cannot.
In order for your Group Leaders to manage their respective Organization/Team, you have two options:
- A virtual page has already been created for you. Group Leaders can simply visit
yourdomain.com/learndash-groups-pluswhile logged in and they will see the dashboard where they can manage any Organizations and/or Teams they are assigned to - You can also create your own page, and add the shortcode
[learndash_groups_plus]or the Gutenberg Block “LearnDash Groups Plus” to the page. This page will act exactly like the page in option 1, but with this option you can add additional content to the page if you’d like. - Delete Team → On the manage team tab, click the trash can icon to the right of the Team you would like to remove and then confirm your decision in the dialogue box
- Click Manage Organization > Add Team
- Enter in the Team name
- You can create a new Team Leader by entering in their First and Last name, Username, Email and Password, or you can check the ‘Team Leader already exists?’ checkbox and select a pre-existing Team Leader.
- Next select the course(s) you wish to include within the Team and click the arrow to add to the ‘Active Courses’ box.
- Click Save
- Under the Groups Plus Organization Panel, go to Email
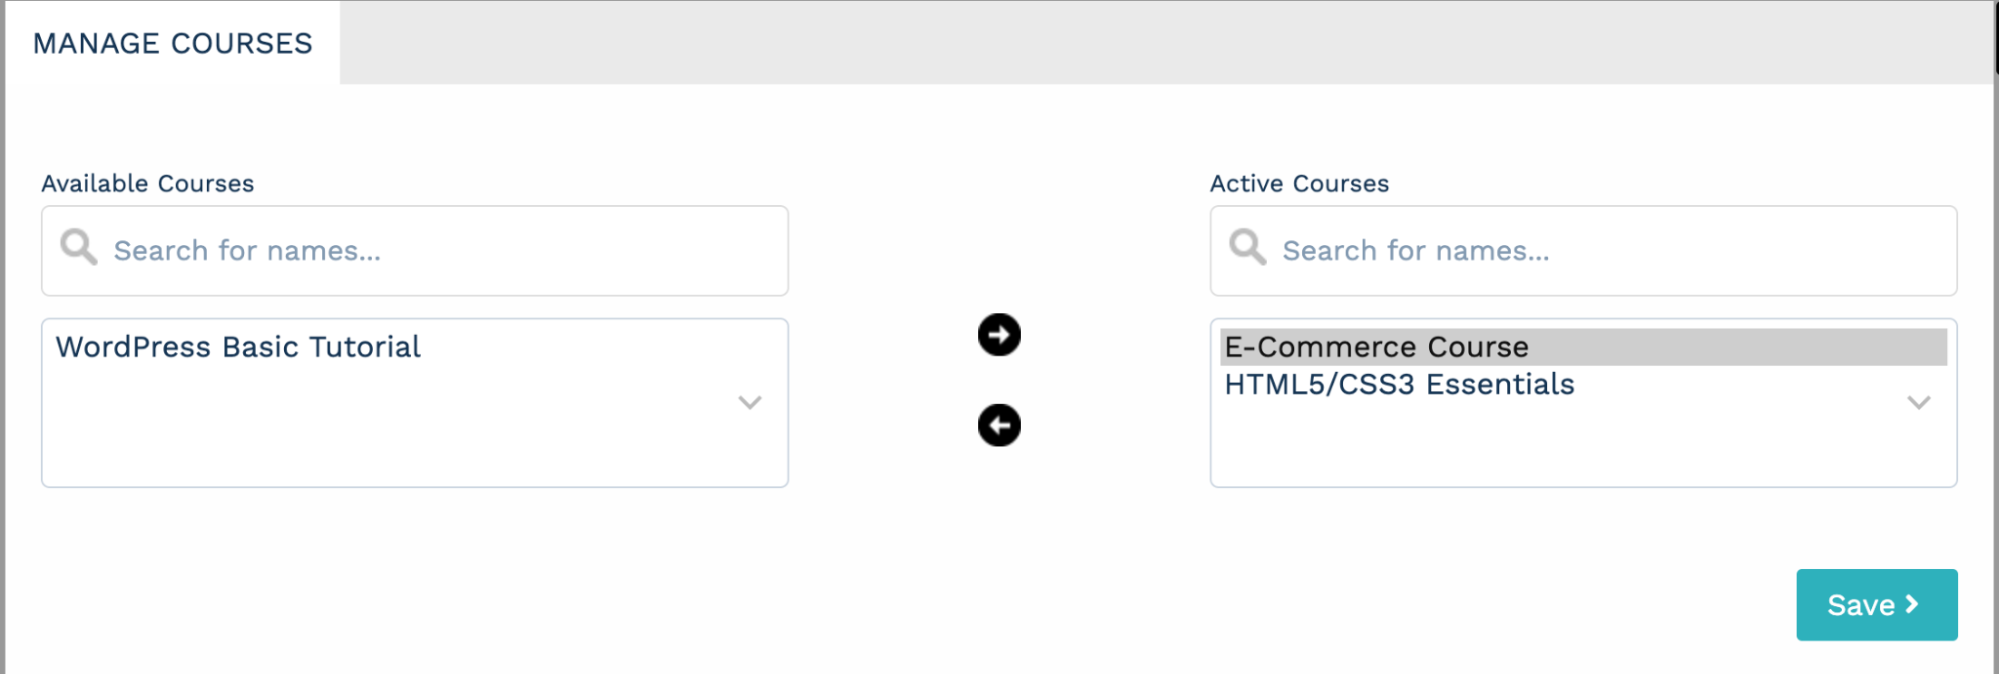
- Click the course on the left that you’d like to add
- Click the right arrow to move that course into the “Active Courses” window
- Click the Update Profile button at the bottom of the page
- Click the active course(s) on the right that you wish to remove
- Click the left arrow to remove the course(s) from the “Active Courses” window
- Click the Save button at the bottom of the page
When a Group Leader visits either page, they will see a dashboard that looks something like this:
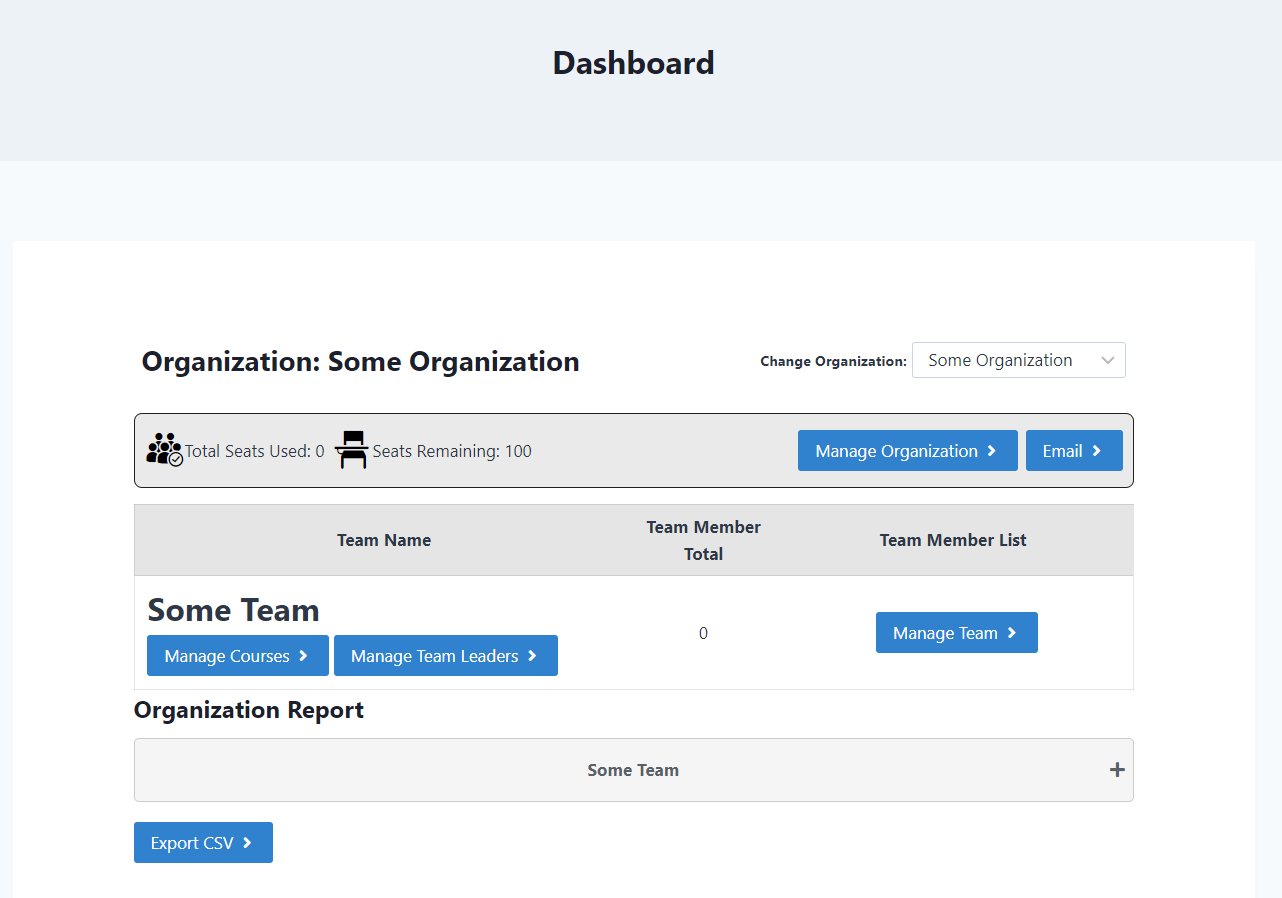
This Group Leader is a Lead Organizer for a group called Some Organization. The Lead Organizer can manage the courses available, manage teams, manage team leaders etc.
The things your Group Leader can do depend on the settings you choose in LearnDash LMS > Groups > Settings
The section called Group Leader User Settings has several different options for your Group Leaders that you may want to enable depending on your customer’s needs.
Managing an Organization
Only Lead Organizers will have access to this settings view to create and manage teams. Others will not be able to see it.
Manage Team → Allows you to add and delete Teams.
Add Team → Switch tabs to enter the details necessary to create a new Team.
Configure your Team Leader welcome Emails and send broadcast message to all your team leaders within the group.
Choose whether to create a broadcast email to Team Leaders or to edit the Team Leader Welcome Email by selecting the correct tab at the top of the popover window. Within each tab, you will find the tools to send a Broadcast email or to set a Team Leader Welcome Email.
Manage Courses
This section allows you to see which courses are a part of each Team. You can also add course(s), or remove course(s) from the Team.
To add course(s) to a Team:
-
To remove course(s) from a Team:
Manage Team Leaders
Add or remove Team Leaders from a Team, or add a Team Leader as a “Team Leader and Team member” (this is useful if you want the Team Leader also to take the courses).
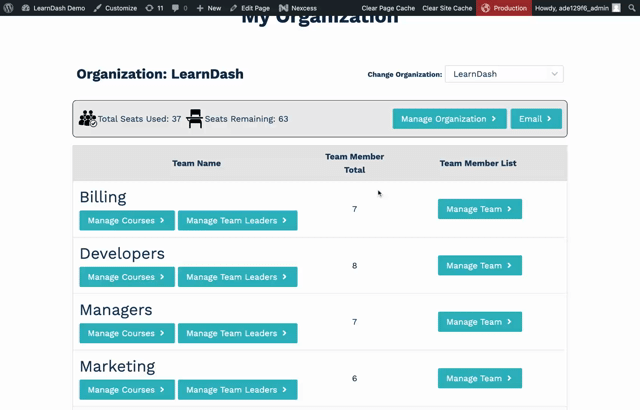
Manage Team
Click Manage Team to access and manage an individual Team. Learn more about managing a Team on the Front End Dashboard.
Organization Report
View the entire Organization’s grades through the Organization Report. The Lead Organizer can view each Team and the average percentage grade for each course, or drill down and see each individual Team member’s grade. Click Export CSV to download the Organization’s entire report.
Managing a Team
Team Leaders can purchase additional seats, add Team Members, view and manage assignments, run reports, and email the Team individually or all at once.
If you plan to sell Teams, this is the front end dashboard your customers would see.
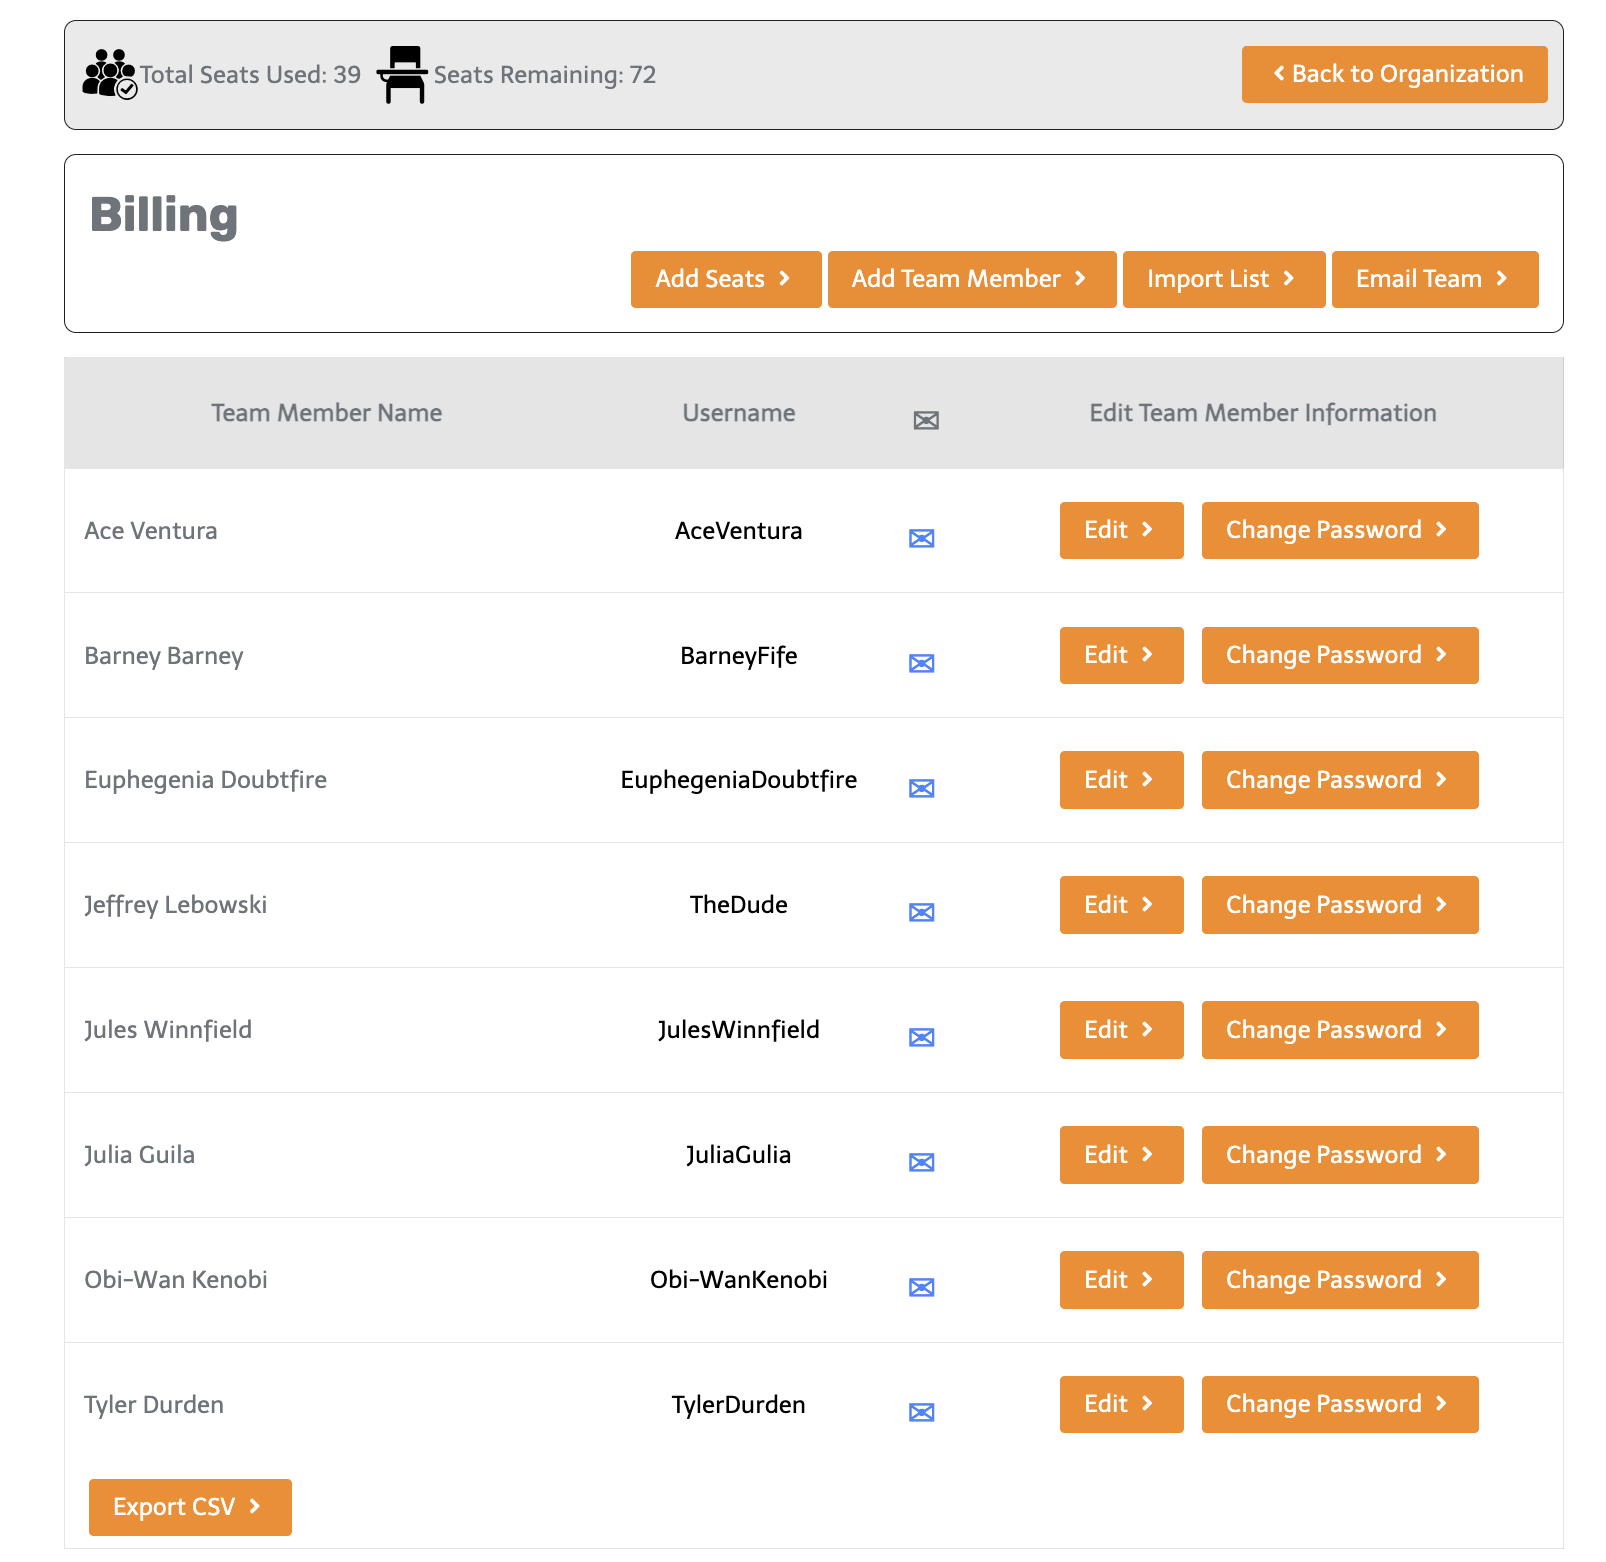
Add Seats
If you are utilizing WooCommerce to sell your Organizations, you can also sell Seats. Once enabled, an “Add Seat” button will appear. Customers can purchase additional seats at any time. Learn how to enable this feature.
Add Team Members
Add Team members to your Team by going to Add Team Members > Enter in the Team members First and Last Name, Email address, Username, and a Password > Click Save.
If they exist in the system already, check the “Team member already exists?” box and search for the specific Team member > Click Save.
Import List
If you have a list of Team Members you’d like to bulk import, you can do so by clicking Import > Click “Download CSV template” > Fill out the CSV file > Under Upload File, select Browse > Select the template and click Open > Click Save.
Email Team
Click Email team to send a Broadcast email or to set a Team member Welcome Email. You can also send a Broadcast Message through the message board. Use the message board shortcode on any page for the Team members to view your messages:
[learndash_groups_plus_message_board].
Click the email icon to the right of a specific Team member to email them directly.
Edit
Click Edit to update the Team member’s information or to delete them from the team (you can remove the ability to delete/edit a Team member if desired).
Change Password
Change the Team Member’s password by clicking Change Password.
Export CSV
You can export the Team’s report by clicking Export CSV.