
When Groups Plus is installed and activated, you now have two types of groups:
- Organizations
- Teams
By default, groups will have the type of “Organization”.
A group becomes a “Team” when it’s assigned a parent Organization.
Table of Contents
Types of Organizations
With Groups Plus, you can create private organizations, or you can create organizations and sell them using WooCommerce.
Private LearnDash Organizations
If you don’t want to use WooCommerce to sell your Organizations directly from your website, you can create a “Private Organization”. With Private Organizations, you work out offline with your customer how many teams the organization will have, how many seats are available and which courses are available. Then, once you’ve worked out payment with the customer you would go into the backend of your website and create the Organization per the customer’s requirements.
To create a new Private Organization, navigate to LearnDash > Groups and click Add New in the top-right.
Most of the options here will be the same as with standard Groups. However, you’ll notice some new options that weren’t there before.
Team Members
When creating a Private Organization, you have the option of choosing how many team members the organization can have.
To add team members, find the LearnDash Groups Plus Team Members section, and enter the number of team members you want to add in the Number of Team Members field.
The Number not using seats field can be used to determine how many Lead Organizers the Organization can have that don’t count against the number of team members. (Lead Organizers have permissions that regular team members don’t have, allowing them to manage the Organization. More on Lead Organizers later).
For instance, if you have 100 Team Members, and 5 not using seats, that means the Organization could have a total of 105 members. (100 regular members, and 5 Lead Organizers).
Alternatively, if you don’t add anything to the Number not using seats field, and you want 5 Lead Organizers, you could only have 95 regular members.
Typically you would work out with your customer ahead of time how many seats will be available to the Organization, and then the Lead Organizer will have the ability to decide how many of those seats will be available to which team.
For instance, you may have an Organization with 100 seats, and there may be three Teams within that Organization. The Lead Organizer might decide that Team 1 gets 30 seats, Team 2 gets 30 seats, and Team 3 gets the remaining 40 seats. It’s up to the Lead Organizer how to divide up those seats between the Teams.
Courses
Once you’ve named your Organization, given it a description (if desired) and entered the number of team members the group can have, it’s time to click on the Courses tab towards the top.
Here you will see a list of courses that you’ve already created. Click on the courses that you want to be available to this group, and click the right arrow to add them to this group.
Users/Lead Organizer
Once you’ve finished adding the appropriate courses to the group, go ahead and click on the Users tab.
Here you will have two sections. The first section allows you to add regular team members. You will probably mostly leave this blank, and allow the Lead Organizer to add team members, but you as the admin do have the option to add them here if you’d like.
The second section is for the Lead Organizer(s). You’ll notice this section is called Group Leaders.
Group Leader is a custom user role that LearnDash creates that allows a WordPress user to either be a Lead Organizer (someone who manages an Organization) or a Team Leader (someone who manages a Team).
To assign a Lead Organizer to this Organization, select the user from the list and click the right arrow to add them.
Note In order for a user to be added as a Lead Organizer/Team Leader, they will need to be assigned the user role of Group Leader. You can do this by navigating to Users and clicking on the user to edit them. For more information about Group Leaders, click here
That’s it! Now that your customer has been made Lead Organizer, they can login to their dashboard and manage the Organization.
Teams
We mentioned earlier that an Organization might have several teams within.
To create a Team, navigate to LearnDash LMS > Groups and click Add New.
To make this Group a Team, simply give it a Parent group.
Once a group is given a Parent Group, it becomes a Team.

As the admin, you typically won’t choose a number of Team Members (seats) for a Team. You would usually leave that up to your customer (Lead Organizer).
In fact, you might not even create any Teams yourself and leave even the creation of Teams up to the Leader Organizer. It’s completely up to you and your customer to work that out.
Teams work very much like Organizations. Much like you can assign a Lead Organizer to an Organization, you can assign a Team Leader to a Team.
The process is exactly the same. Make sure the user has the user role of Group Leader, then when editing the Team click on the Users tab and scroll down to the Group Leaders section.
Here is a short video that walks you through the process of creating a Private Organization.
LearnDash Pre-Built Organizations
If you plan to continue selling Organizations over and over, it would be a pretty big hassle for you to have to go through all the steps of setting up a Private Organization every time you get a new customer.
The solution to this is to set up a Pre-built Organization, and let customers purchase it from your website. When you do this, you only have to set up the Organization once, and then you can keep reselling it over and over to new customers.
In order to sell Organizations from your website, you will need to install and set up WooCommerce.
Note Make sure you update your WooCommerce settings to require that customers have an account, otherwise your customer will have no way of managing their Organization/Team after purchase. For full instructions, please visit our WooCommerce Integration add-on documentation.
When you create a WooCommerce LearnDash Pre-Built Organizations, you allow your customer to purchase a pre-created (or “Pre-Built”) Organization through your site. They will create their Organization name, and enter in the number of seats they need. The customer will become the Lead Organizer of the Organization, allowing them to create additional Teams, add courses to the Teams, assign a Team Leader, and enroll Team Members.
- Navigate to LearnDash LMS > Groups Plus > Settings and click to Enable WooCommerce Integration
- Click Save
- Navigate to LearnDash LMS > Groups and click Add New
- Give your Organization a Title, and if applicable, add Courses
- In the right-hand toolbar, under LearnDash Groups Plus WooCommerce, check Enable WooCommerce and Pre-Built Organization
- Enter the Organization seat price (this is the price per-seat you wish to charge)
- If you would like to include some pre-built Teams in this Organization, you would simply navigate to LearnDash LMS > Groups, click Add New
- Give your Team a Title, and add any Courses you want available to this team
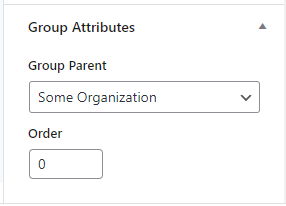
- In the right-hand tool bar, under Group Attributes > Group Parent > Select the Parent Organization.
- Click Publish
- Navigate to Products and click Add New
- Enter a product name, description, and product image
- Select LearnDash Pre-Built Organization from the Product Data field
- Under General > Regular Price, enter the Price you wish to sell the Organization for (this is a base price for the Organization. Seat price will be additional)
- Go to Organization Groups and select all the Groups you wish to sell.
- Click Publish
- Navigate to LearnDash LMS > Courses and click on a course you want to be available in this Organization.
- In the right-hand toolbar, under LearnDash Groups Plus WooCommerce, enter the Course Price (this is the price per seat for this course) > Click Save.
- Repeat this step for all courses you wish to sell within this Organization
- Navigate to Products and click Add New
- Enter a product name, description, and product image
- Select LearnDash Organizations product from the Product data field
- Under General > Regular Price, enter in the Price you wish to sell the Organization for (this is a base price for the Organization. Seat price will be additional)
- Go to Organization Courses and select all the Courses you wish to sell
- Click Publish
Here’s a short video that walks you through setting up a Pre-built Organization.
LearnDash Organizations
In order to sell Organizations from your website, you will need to install and set up WooCommerce, as well as the LearnDash WooCommerce integration (both of which are free).
When you create a LearnDash Organization, you are allowing your customer to purchase and create their own Organization through your site. They can select the Courses they wish to purchase, and the number of seats they want for each Course. Each Course will become a Team within the customer’s Organization. The customer will become the Lead Organizer of the Organization, giving them the ability to create additional Teams, add courses to the Teams, assign Team Leaders, and enroll Team members.
To create a LearnDash Organization
Note With this type of organization, you don’t actually have to create an Organization like we did for Private and Pre-built Organizations. In this case, the Organization will be created when the customer makes a purchase.
Here is a short video that walks you through how to create a LearnDash Organization.