
Because LearnDash leverages WordPress’ existing user management system, you can manage users (aka: students) entirely from their user profile in the WordPress admin area. This article will explain the various user data that LearnDash collects, where to find it, and how to update it.
Table of Contents
The LearnDash User Role
When someone enrolls into a course, LearnDash assigns them the “Subscriber” role. This is one of the default roles used by WordPress. Check out WordPress’ Roles and Capabilities to learn more about each user role. There are a few things to keep in mind with user roles:
- Users can be assigned more than one role at a time.
- Some plugins add & assign users to additional roles. For example:
- WooCommerce adds the “Customer” role to those who have made a purchase.
- bbPress adds the “Participant” role to those who have participated in a forum discussion.
- If an “Administrator” or “Group Leader” has access to a LearnDash course(s), you won’t see the “Subscriber” role listed in their profile because Administrators & Group Leaders already have all the same permissions as a Subscriber (plus additional ones).
NOTE
If you want to learn more about each plugin’s additional roles that are added to your WordPress site, visit each of the plugins support pages.
View All Users
LearnDash uses WordPress’ built-in user management system. When a user enrolls in a LearnDash course, becomes a group leader, or any other action associated with LearnDash, that information is stored in the user’s WordPress profile.
To view all users:
- Navigate to USERS > ALL USERS
In addition to the default information WordPress displays (Username, Name, Email, Role, Posts), LearnDash adds an additional column for Enrolled Groups/Courses.

Filter by Course or Group
You can filter your users based on the course in which they are enrolled, and/or the group in which they belong.
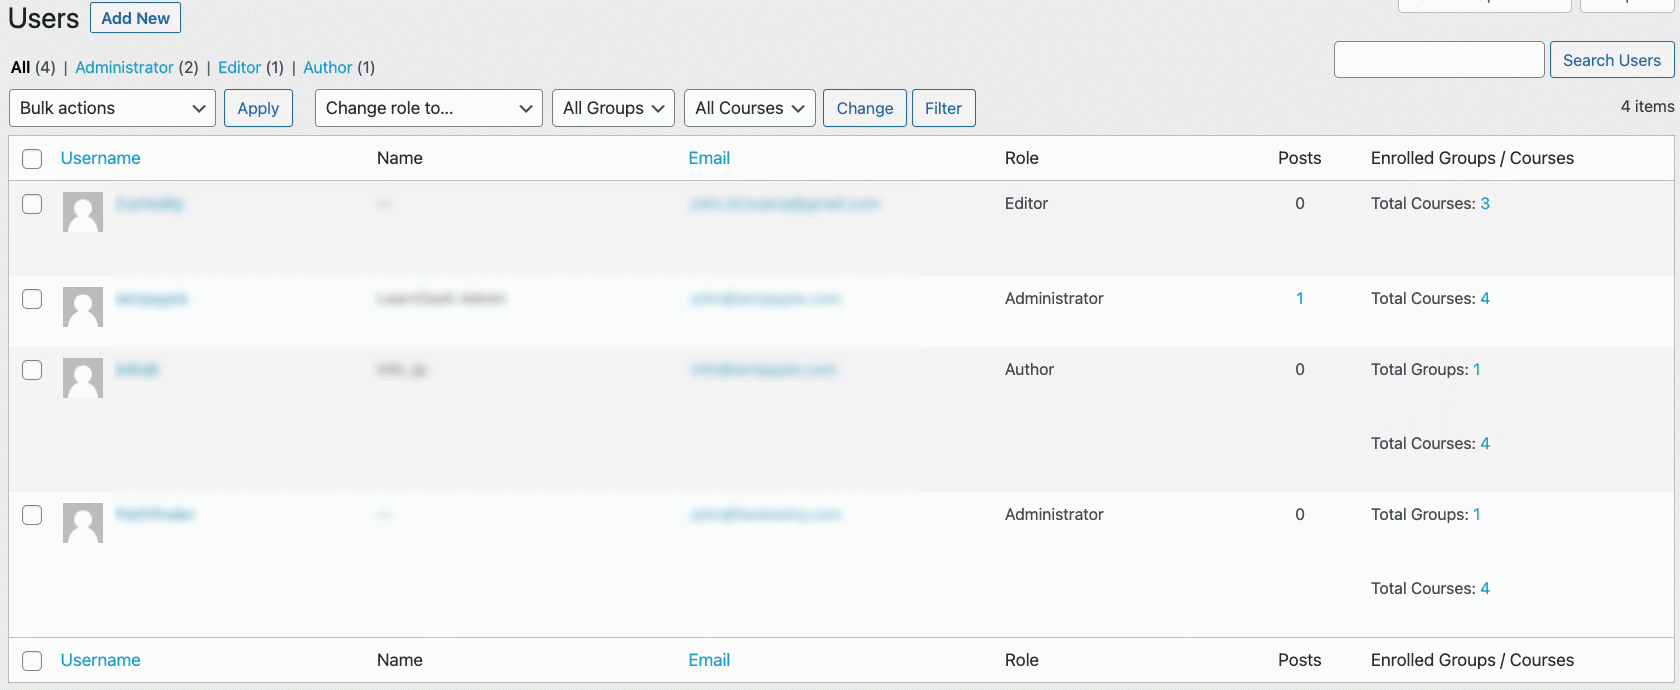
- Click the All Courses and/or All Groups dropdown(s) at the top
- Choose your course and/or group
- Click the Filter button
Only the users enrolled in that course (or in that group) will be shown.
User Profiles
Each user has his/her own profile page. In addition to the basic information WordPress displays, LearnDash stores course & group information on this page as well.
To access a user’s profile:
- From the USERS > ALL USERS page…
- Click on the username of the user you’d like to view
The first information you’ll see is general, personal information about the user. Scroll down to view the additional sections that LearnDash adds to the user profile.
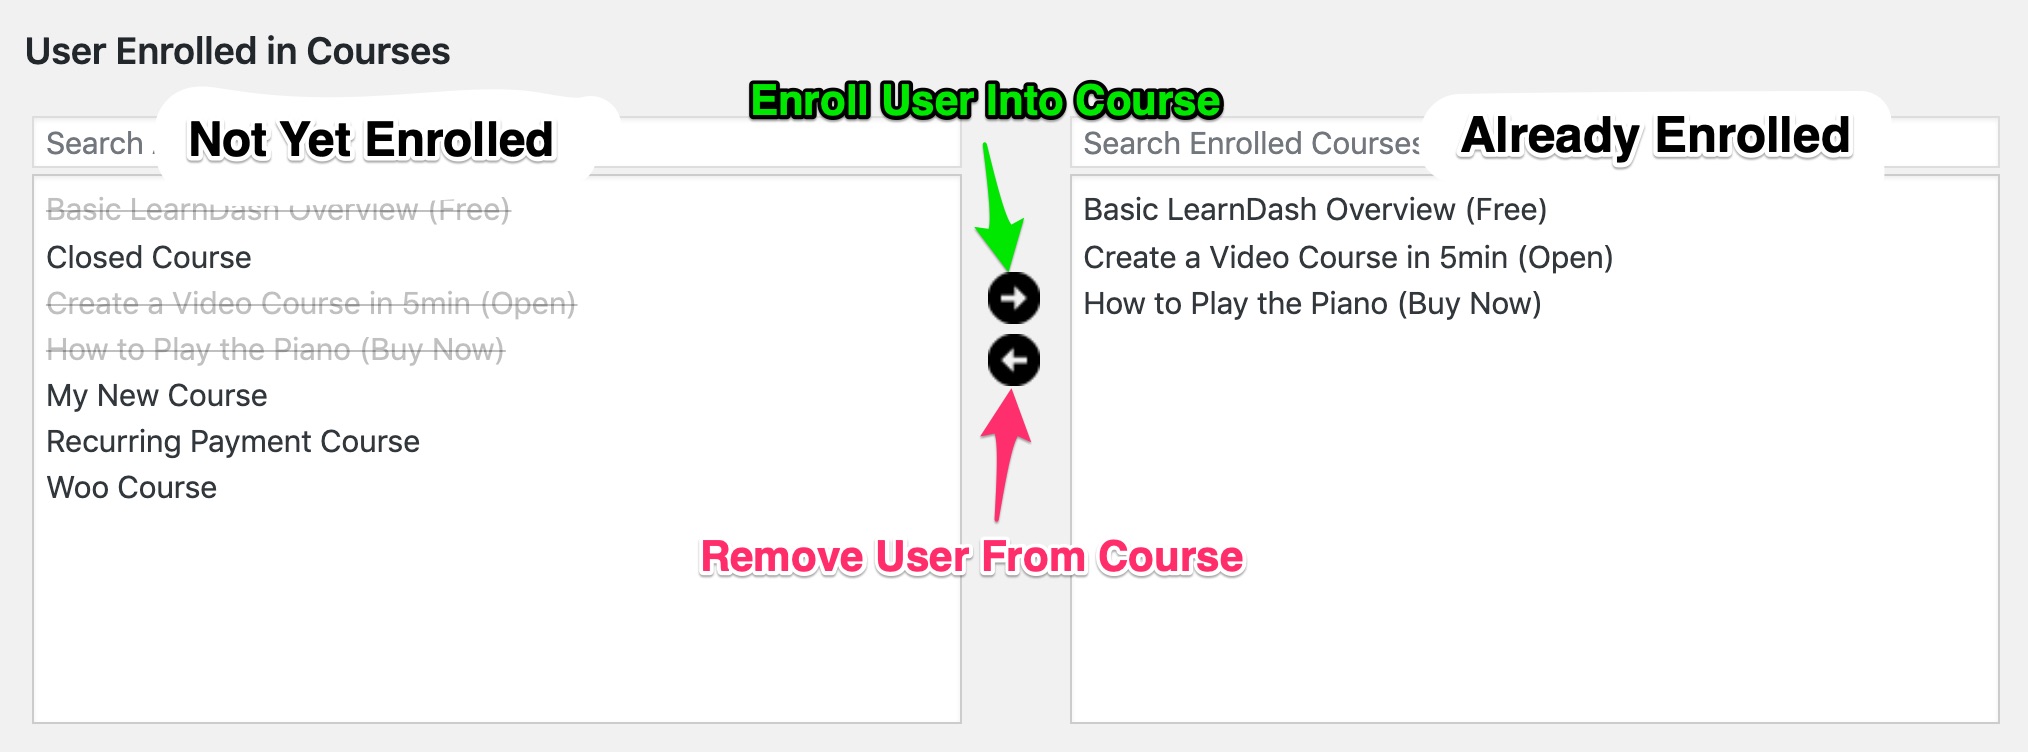
User Enrolled in Courses
This section allows you to see which courses the user is currently enrolled in. You can also enroll users into a course(s), or remove them from currently enrolled courses.
To enroll a user into a course:
- Click the course on the left that you’d like to enroll them in
- Click the right arrow to move that course into the ‘Already Enrolled’ window
- Click the Update Profile button at the bottom of the page
To remove a user from a course:
- Click the course on the right that they are already enrolled in
- Click the left arrow to remove that course from the ‘Already Enrolled’ window
- Click the Update Profile button at the bottom of the page
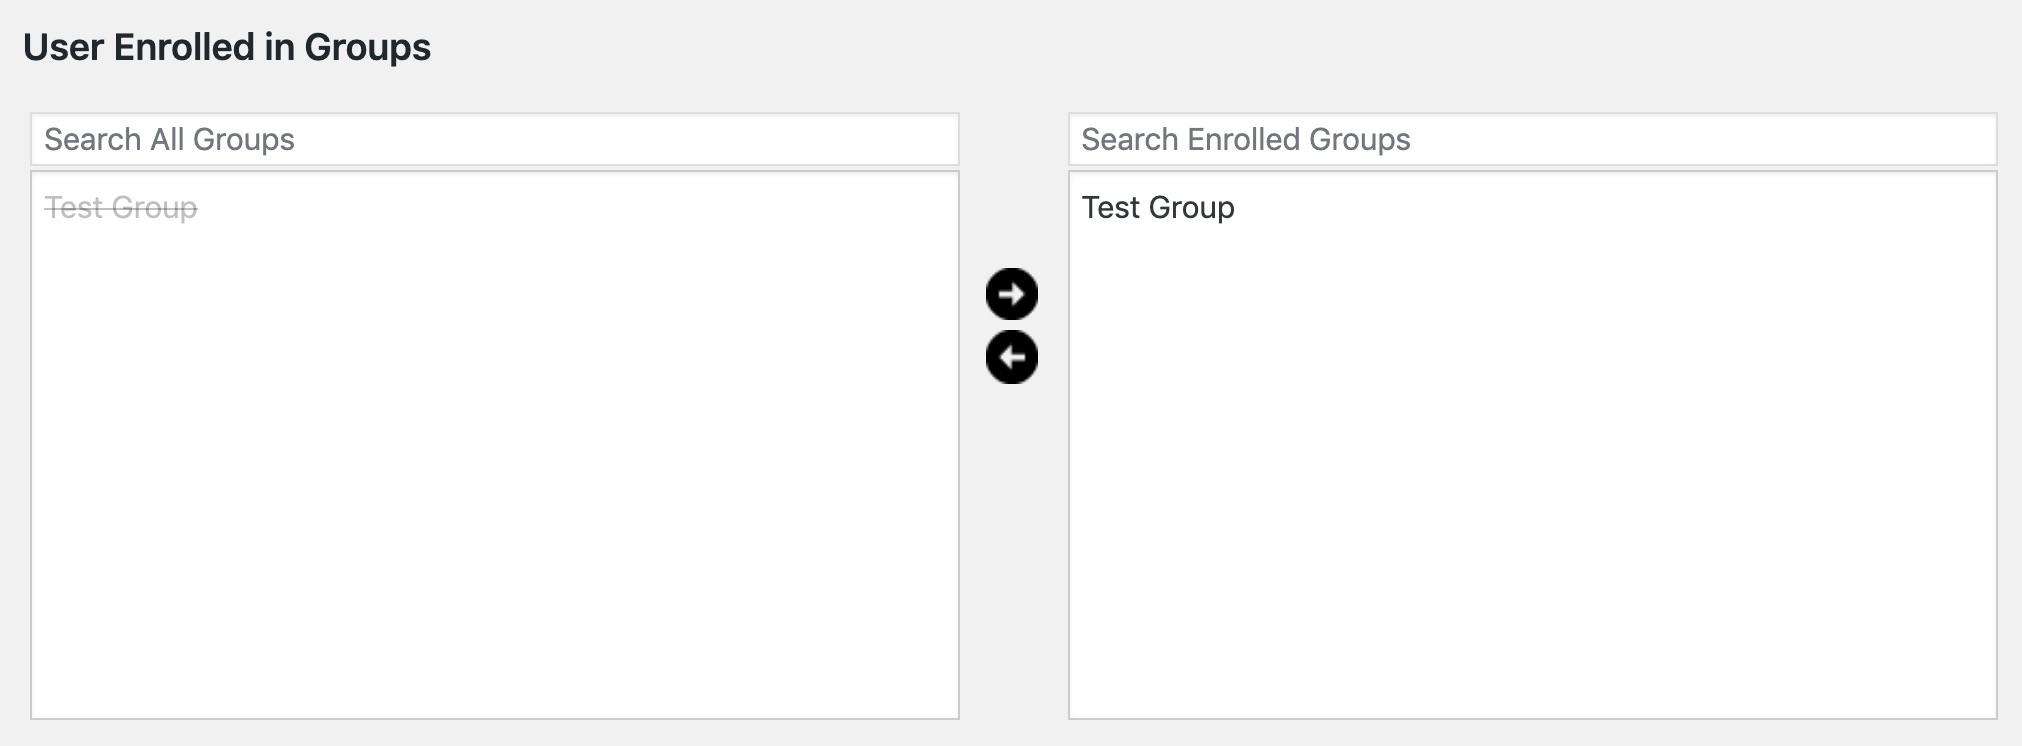
User Enrolled in Groups
This section works in very much the same way as above, only for groups instead of courses.
- Left Side: These are groups you have created, but the user is not yet a member.
- Right Side: These are the groups in which the user is already a member.
Use the arrows in the middle to add or remove this user from a group.
Course Info
Earned Course Points
The total earned course points for the user is displayed in this section. You also have the ability to add extra course points to the user’s account.
- Enter the number of extra points you’d like to award
- Click Update Profile at the bottom
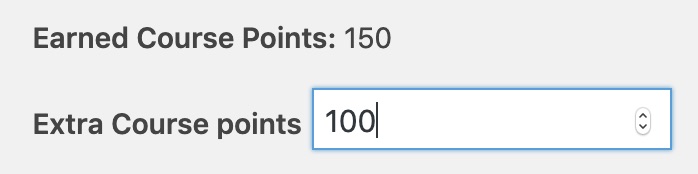
Course points are displayed on the user’s profile by using the LearnDash Profile block or shortcode. They can also be inserted anywhere on your site using the [ld_user_course_points] shortcode (or the associated block).
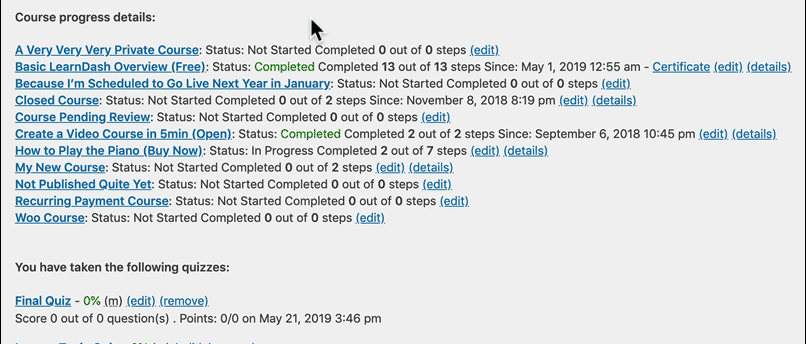
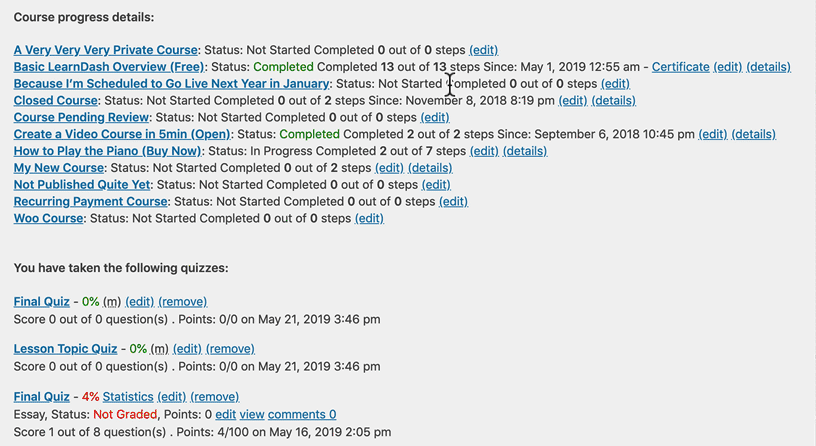
Course Progress Details
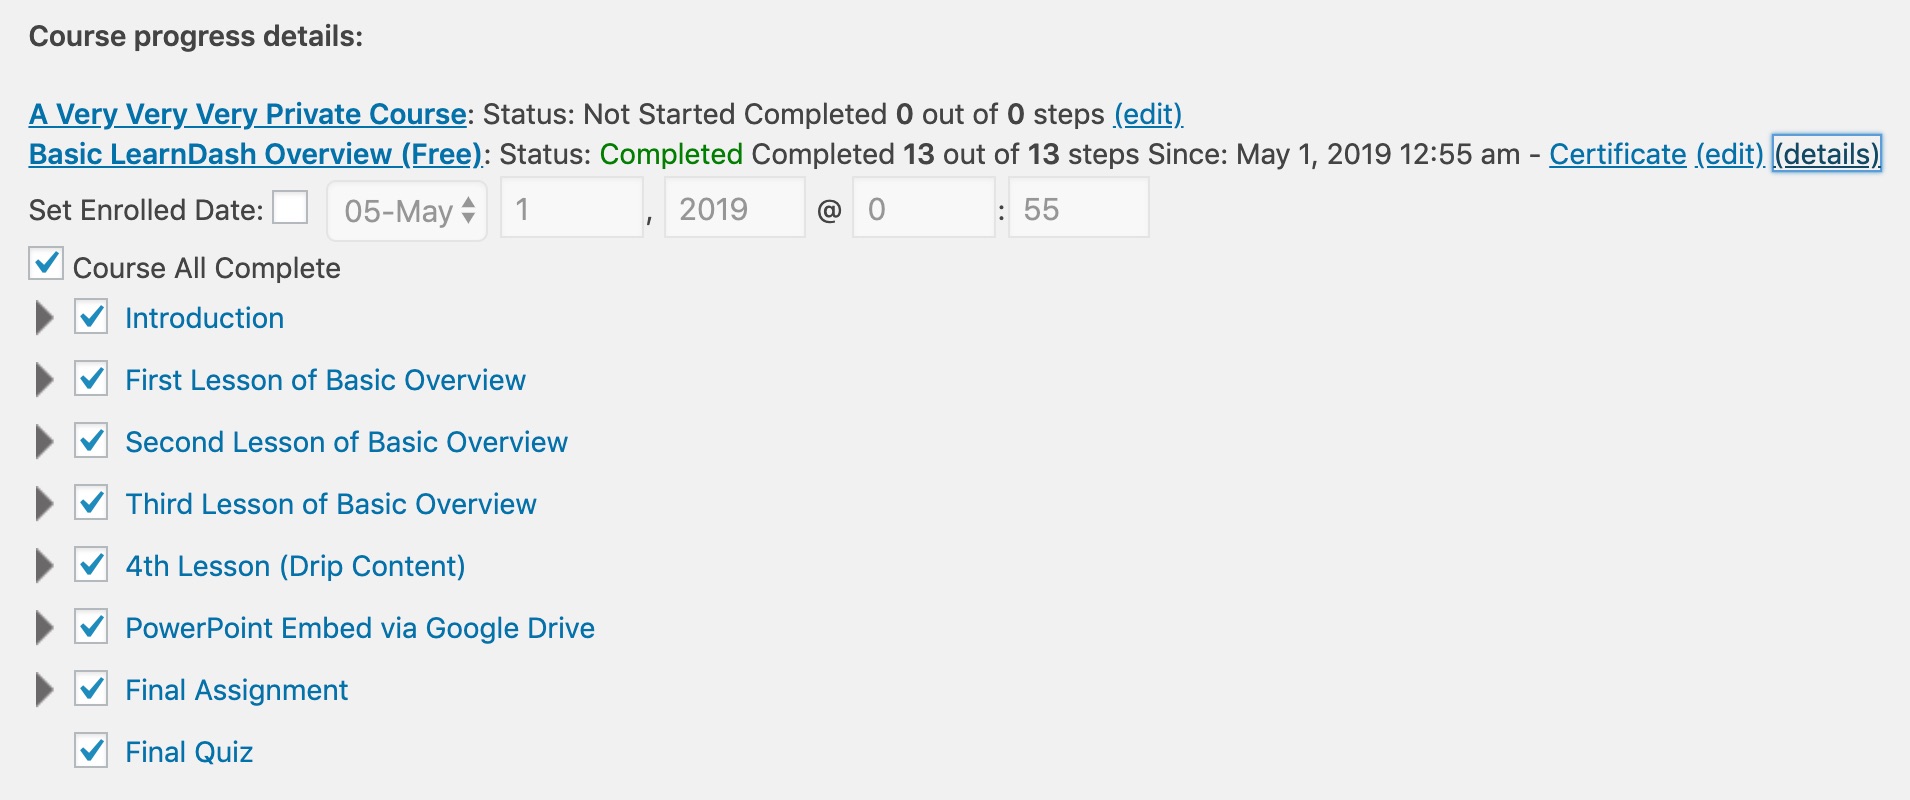
This section lists all the courses that the user is currently enrolled. For each course, the following information is provided:
- Name of the course (with a link to view the course page)
- Course Status: Not Started, In Progress, Completed
- X of Y steps completed
- A link to edit the course (assuming you have the correct permissions to do so)
- A “details” link to view more information about course steps & enrollment date
Clicking on the “(details)” link will display additional information about the user’s access & progress in the course.
Enrollment Date
The date & time that a user enrolls into a course is captured and stored by LearnDash. This can be used to limit course access to a certain number of days, or drip feed lessons at a specified interval, starting from the date the user enrolls.
The original enrollment date is listed, but greyed out by default. To update the user’s enrollment date for that course:
- Click on (details) at the end of the course name list
- Make sure to click the checkbox after Set Enrollment Date
- Update the enrollment date
- Click the Update Profile button at the bottom of the page
If you’ve set your course to expire after a certain number of days, this new enrollment date will automatically take effect, and the user’s course access will be updated.
NOTE
The Set Enrollment Date option isn’t available when a user is enrolled into a group.
Mark Steps Complete/Incomplete
If you need to change the status of a lesson, topic or quiz for one of your user’s, you can do so from the user’s profile. As an administrator, you can mark any course step as either complete or incomplete, simply by using the checkboxes.
- Click the “(details)” link to view course steps
- (optional) Use the arrows on the left to view topics/quizzes beneath a lesson
- Check or uncheck a box next to any lesson, topic or quiz
- Click the Update Profile button at the bottom of the page
This will instantly change the status of that course step for the user.
Quiz Information
Underneath the course progress details, you’ll find a section with the heading, “You have taken the following quizzes:”. You can view all of a user’s quiz attempts, scores and more.
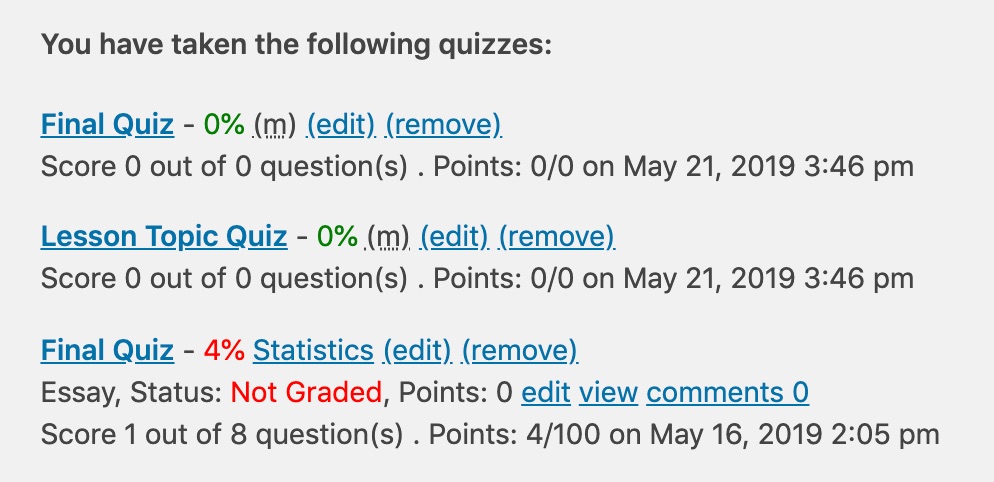
- Click the “(remove)” link to complete remove the quiz from the user’s profile (this will delete all answers & points)
- Click the “(edit)” link to edit the quiz in the WordPress admin
- Click the “Statistics” link to view complete quiz stats in a modal window
- View the score (in percentage, as well as X of Y questions correct)
- View the total number of points awarded
- View the date & time the quiz was completed
- View the essay status, edit the essay question & view comments, if the quiz contained one or more essay questions
NOTE
Statistics and quiz information for a specific user are only recorded if the Quiz Statistics option is enabled in the individual quiz settings. This option is also not retroactive. Any quizzes taken while this option is turned off will not display statistics, conversely, any quizzes taken with this option turned on will always display statistics.
Permanently Delete Course Data
WARNING
This action is permanent & cannot be undone. Proceed with caution.
If you need to completely remove a user’s course data, you can use this option. This will permanently erase all LearnDash data associated with this user.
- Check the box to permanently delete data
- Click the Update Profile button

Additional Resources
If you purchase a LearnDash PLUS or PRO license, you have access to a reporting tool called ProPanel, which includes additional user management features.
You might also want to explore other reporting capabilities.