Creating a profile or account page for your users enhances their experience by providing easy access to essential LMS features. Through their profile, students can view all the courses they’re enrolled in, edit their personal information, and pick up right where they left off in any course. They can also keep track of their progress by viewing awarded points and quiz grades, as well as access any certificates they’ve earned, all in one convenient place. This central hub not only simplifies navigation but also ensures students stay engaged and informed throughout their learning journey.
LearnDash does not automatically generate a page to display a user’s profile or course information, but there are several tools you can use to build your own custom profile page. We’ll talk about the main LearnDash Profile block/shortcode, some options if you’re using third-party plugins that collect user information, and a few other tips for building a user profile with LearnDash.
LearnDash Profile Block/Shortcode #
The most commonly used solution for creating a LearnDash profile is to use the block (or shortcode) that comes with LearnDash. No additional plugins are required. You simply create a page on your site, and then insert the block/shortcode where you want the profile information to appear.
How to Use It #
To use the LearnDash Profile block:

- Create a new page in WordPress
- Click the
+icon to add a new block - Search for LearnDash Profile
- Select the LearnDash Profile block
To use the LearnDash Profile shortcode, simply use this shortcode:
[ld_profile]
For a full list of available options, please see the LearnDash Profile section in our blocks/shortcodes documentation.
LearnDash 3.0 Template #
If you’re using LearnDash 3.0+, and have the LearnDash 3.0 template enabled (check settings here), the LearnDash Profile will display the following information:
- Avatar (profile image)
- Name
- Link to edit profile
- Total number of courses enrolled in, courses completed, certificates awarded and points earned
- List of registered courses, which includes:
- ability to search courses
- course progress indicators
- links to download certificates
- quizzes taken, along with date, scores and statistics

LearnDash Legacy Template #
If you’re using the LearnDash Legacy template, your profile will look different, and include the following information:
- Avatar (profile image)
- Name, Username, Email
- Course Points
- Link to edit profile
- List of registered courses, which includes:
- course progress indicators
- links to download certificates
- quizzes taken, along with date, scores and statistics

Display Enrolled Courses in a Grid #
The LearnDash Profile will display all courses in which the user is enrolled. This might be all you need, but you can also use the Course Grid add-on to show enrolled courses in a grid.
First, make sure the Course Grid add-on is installed and activated. Then, if you’re using the latest WordPress editor:
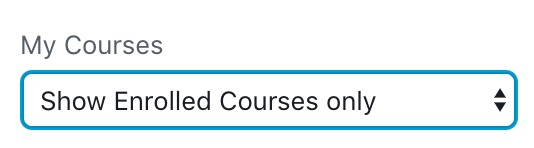
- Insert the LearnDash Course List block
- Set the My Courses option to Show Enrolled Courses only
You can also enable the option to Show Progress Bar, which will display the user’s progress in each course.
If you’re using a page builder, or just prefer to use the shortcode, use the following shortcode to output a user’s enrolled courses, with a progress bar:
[ld_course_list mycourses="true" progress_bar="true"]
There are several other options you can use to customize the grid. Please see the Course Grid documentation for full details.
Uncanny Toolkit Course Dashboard #
NOTE: This is a third-party add-on that requires the Uncanny LearnDash Toolkit Pro plugin.
With the Uncanny Toolkit Pro, you can use the [uo_dashboard] shortcode to insert a modified version of the [ld_profile] shortcode. It displays similar information, but there are a few key differences. The Course Dashboard:
- does not display the user’s profile information (avatar, name, email, etc.)
- also displays lessons & topics within each course (which the LearnDash Profile does not)
You can still expand/collapse each course, quickly view overall course progress, view quiz information, certificates, etc. Here’s what the Toolkit’s Course Dashboard looks like:

The Uncanny Toolkit Course Dashboard is also available as a Gutenberg block. There are some additional options you can set, as well. Please see Uncanny Owl’s full documentation.
Resume Where You Left Off #
Another really helpful tool for LearnDash users is the ability to jump right back to the previous course, lesson or topic that they last worked on. The free version of the Uncanny LearnDash Toolkit provides this feature with their Resume Button module. When used on a custom profile page, it simply inserts a button that links to the most recently viewed course, lesson or topic for that specific user.
To use this feature:
- Install and activate the free Uncanny LearnDash Toolkit plugin
- Navigate to Uncanny Toolkit > Modules
- Enable the Resume Button module
- Add the following shortcode to your profile page, a sidebar, or a page builder, where you want the button to appear
[uo_learndash_resume]
The button defaults to say Resume, but you can customize this text. You also have the option to display the title of the course, lesson or topic that the button is linking to.
The Uncanny Toolkit Resume Button is also available as a Gutenberg block.
List of All Certificates #
Another helpful shortcode provided by the free Uncanny LearnDash Toolkit plugin is the ability to list all certificates earned by the user. Follow the same instructions above to install the plugin and enable the List Certificates module, then use this shortcode to display a user’s earned certificates:
[uo_learndash_certificates]
The Uncanny Toolkit List Certificates module is also available as a Gutenberg block. A few additional options are detailed in Uncanny Owl’s documentation.
WooCommerce Account Page #
Many LearnDash users choose WooCommerce as an ecommerce platform to sell their courses (see our integration guide). WooCommerce creates its own account area, complete with account details (name, email, etc.), address information, order history, etc. You can tap into this to include a list of enrolled courses.

If you’re already using WooCommerce, or you’ve gone through the setup wizard, a “My Account” page should have already been created for you. If not…
- Create a new page in WordPress
- Insert this shortcode
[woocommerce_my_account]
NOTE: The design of your WooCommerce “My Account” page is heavily dependent on your WordPress theme. If your theme doesn’t offer great support for WooCommerce, you might want to check with your theme developer, or possibly hire someone to help with the design.
On this same page, you can insert any of the tools we highlighted above (LearnDash Profile, Resume Button, List of Certificates, etc.). Whatever you insert onto this page will be displayed on all WooCommerce account sub-pages (dashboard, orders, addresses, account details, etc.). This might not be ideal, in which case you can explore the next section.

WARNING: By default, WooCommerce blocks non-admin users from entering WP Admin, or seeing the WP Admin bar. This includes the WP Profile. Click here for a workaround.
Custom Endpoint #
NOTE: Development experience is highly recommended.
The “My Account” section of WooCommerce operates on what are called “endpoints.” Each endpoint is essentially another page within the My Account section of your website. Endpoints represent the part of the URL that follows your /my-account/ page. A few examples of built-in WooCommerce endpoints for the My Account area include:
- Orders –
/my-account/orders/ - Addresses –
/my-account/addresses/ - Edit Account –
/my-account/edit-account/
WooCommerce provides the ability for anyone to create their own endpoint. The most obvious way to integrate this with LearnDash would be to create an endpoint for courses. Your endpoint could look something like this:
- Courses –
/my-account/courses/
On this new endpoint, you could then insert any type of profile/course information that we highlighted above. This would allow your user’s course information to have it’s own page and URL. You have complete freedom over the type of endpoint(s) you create, and can insert any type of content you’d like.
View WooCommerce’s documentation on endpoints and/or search the web for how to create a custom endpoint.
Other Options #
Course Points #
If you’re using LearnDash’s built-in points system, you could use the [ld_user_course_points] shortcode (or block) to insert the user’s total points onto a custom profile page. That would output this:
Earned Course Points: 100
LearnDash User Profiles Webinar #
Check out our latest webinar about setting up, building and customizing your user profiles with LearnDash, along with other tips and tricks on how to make it easier for you and your users to update and manage your user profiles.