Since LearnDash 3.6, we’ve shifted some options around to make it easier (or harder to accidentally) for you to change some options. These options include the Custom Labels, REST API Settings and Data Upgrades, each were previously their own tabs.
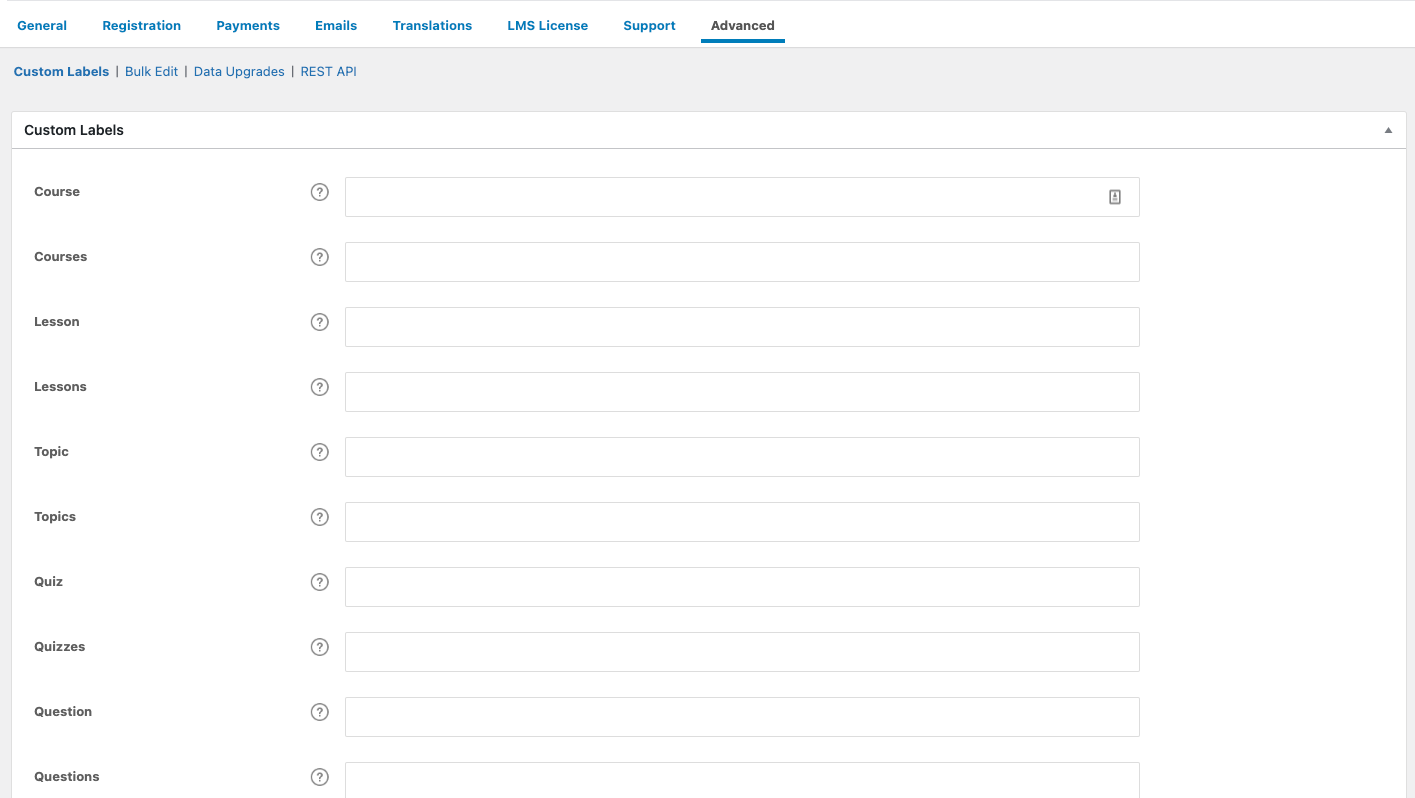
Custom Labels #
Custom labels let you customize how you refer to the learning material on your site. By default, LearnDash uses the “course,” “lesson,” “topic” and “quiz” language, but you can change this to anything you’d like.
For example, you might want to call your lessons “modules” instead. And then maybe you want to rename your topics to “lessons.” You could also rename “quizzes” to be “tests” or “exams.” It’s entirely up to you.
When you apply a custom label, all references to that label will change in the WordPress admin area, as well as on the front-end of your site. Both your site administrators and all of your users will see the new label(s).
URLS / Permalinks #
Custom labels will not affect your URLs. You can change the URLs to match your custom labels in the permalink setting.
The following LearnDash labels are available for customization:
- Course
- Courses
- Lesson
- Lessons
- Topic
- Topics
- Quiz
- Quizzes
- Question
- Questions
- Group
- Groups
- Group Leader
- Challenge Exam
- Challenge Exams
- Take this Course (button)
- Join Group (button)
- Mark Complete (button)
- Mark Incomplete (button)
- Click Here to Continue (button)
- Transaction
- Transactions
You can revert all custom labels back to their default values by using the Reset Settings button at the bottom of the screen.
Any text not included in the Custom Labels section can be modified using the translation files. To do this, you’ll need to edit the current language file and look for the text you want to change to update the label. For detailed steps, please refer to this documentation: LearnDash Translation Guide.
Bulk Editing #
Sometimes when you have a lot of courses, lessons, or even groups on your site, its quite difficult to change one or a couple of settings on those courses, lessons, and groups. You have to go into them one by one.

Bulk editing changes that. You can easily change the Access Mode, Autostart, Video Controls Display, and Video Resume, with just a few clicks.
How to Use Bulk Editing #
- Navigate to LearnDash LMS > Settings > Advanced
- Click on the Bulk Edit tab at the top
Once you’re on the Bulk Edit screen, youll see three options to update. You can either update Courses, Groups or Lessons
For Courses and Groups #
For bulk updating courses and groups, you have to first pick which courses or groups to update. You can select from:
- Where courses/groups: pick the courses/groups you want to update. Hold ctrl or cmd to select multiple courses/groups
- Where course/group title: add keywords, and only select courses/groups whose title contains what you put on the blanks
- Where course/group status: select the course/group statuses that you want to update. Hold down the “ctrl” or “cmd” key to select multiple statuses
- Where access mode: select the access mode of the courses/group that you want to update. Hold down the “ctrl” or “cmd” key to select multiple modes
You can mix and match these filters to make sure that you only update the courses and groups that you want to update. Do note that if you select more than one filter, your target courses/groups must fall into the category of all your filters for it to be included in the update.
After selecting the filters, you can now select what to update:
- Access mode: you can check and update the access mode to select between open, free, buy now, recurring, and closed.
Once you’re done click on the button that says Updated and it will tell you how many courses/groups meet your criteria.
For Lessons #
For Bulk Editing lessons, you have more sets of options to select courses that you want to update:
- Where lesson: pick the lessons you want to update. Hold ctrl or cmd to select multiple lessons.
- Where lesson title: add keywords, and only select lessons whose title contains what you put on the blanks
- Where lesson status: select the lesson statuses that you want to update. Hold ctrl or cmd to select multiple statuses
- Where video progression: select whether or not the lessons that you will update have video progression enabled or disabled
- Where video resume: select whether or not the lessons that you will update have video resume enabled or disabled
- Where course: select the courses where the lessons are in. If you select the entire course, unless you have other criteria set above, all the lessons in that course will be updated.
Once youre done setting the criteria, the next step is to pick which fields of the courses to update:
- Autostart: select whether or not autostart is enabled or disabled.
- Video controls display: select whether or not video controls are displayed or hidden.
- Video pause on window unfocused: select whether or not videos are paused when windows are unfocused.
- Video resume: select whether or not video resume is enabled or disabled.
After setting the settings that you want to update for your lessons, click on Update and the button will also show how many lessons meet your criteria.
Data Upgrades #
In certain circumstances you may be required to run a data upgrade to convert specific LearnDash data sets. You will only be required to run a data upgrade if…
- LearnDash support requests that you run an upgrade, or;
- you receive an admin message prompt on your WordPress dashboard indicating the specific upgrade that needs to be run.
IMPORTANT: To run an upgrade, simply click the button and a progress bar will appear to indicate the status of the upgrade. It is important to let the update run uninterrupted until the progress bar reaches 100%. Afterwards, you can perform other actions from your dashboard.
The possible data upgrades are:
- Upgrade User Course Data & Upgrade User Quiz Data
These two data upgrades copy user course and quiz progress, usually stored in the wp_usermeta table into the Activity table. This is needed for easier reporting and the LearnDash ProPanel reporting plugin.There generally is no need to run the data upgraded on these as the data is synced automatically as the user completed course steps or takes a quiz. - Upgrade Quiz Questions
This data upgrade will convert the legacy questions into proper WordPress posts. Required to use Quiz Builder. - Convert Course Access Lists
This data upgrade was added in LearnDash 3.1. This data upgrade will reconfigure how the course access list shown on the Course edit screen is used. This is not needed unless you are having repeated issues with users losing course access.

Import/Export #
The Import/Export feature allows you to transfer LearnDash post types ( courses/groups/assignments/etc) and their settings into another LearnDash install.

Export #
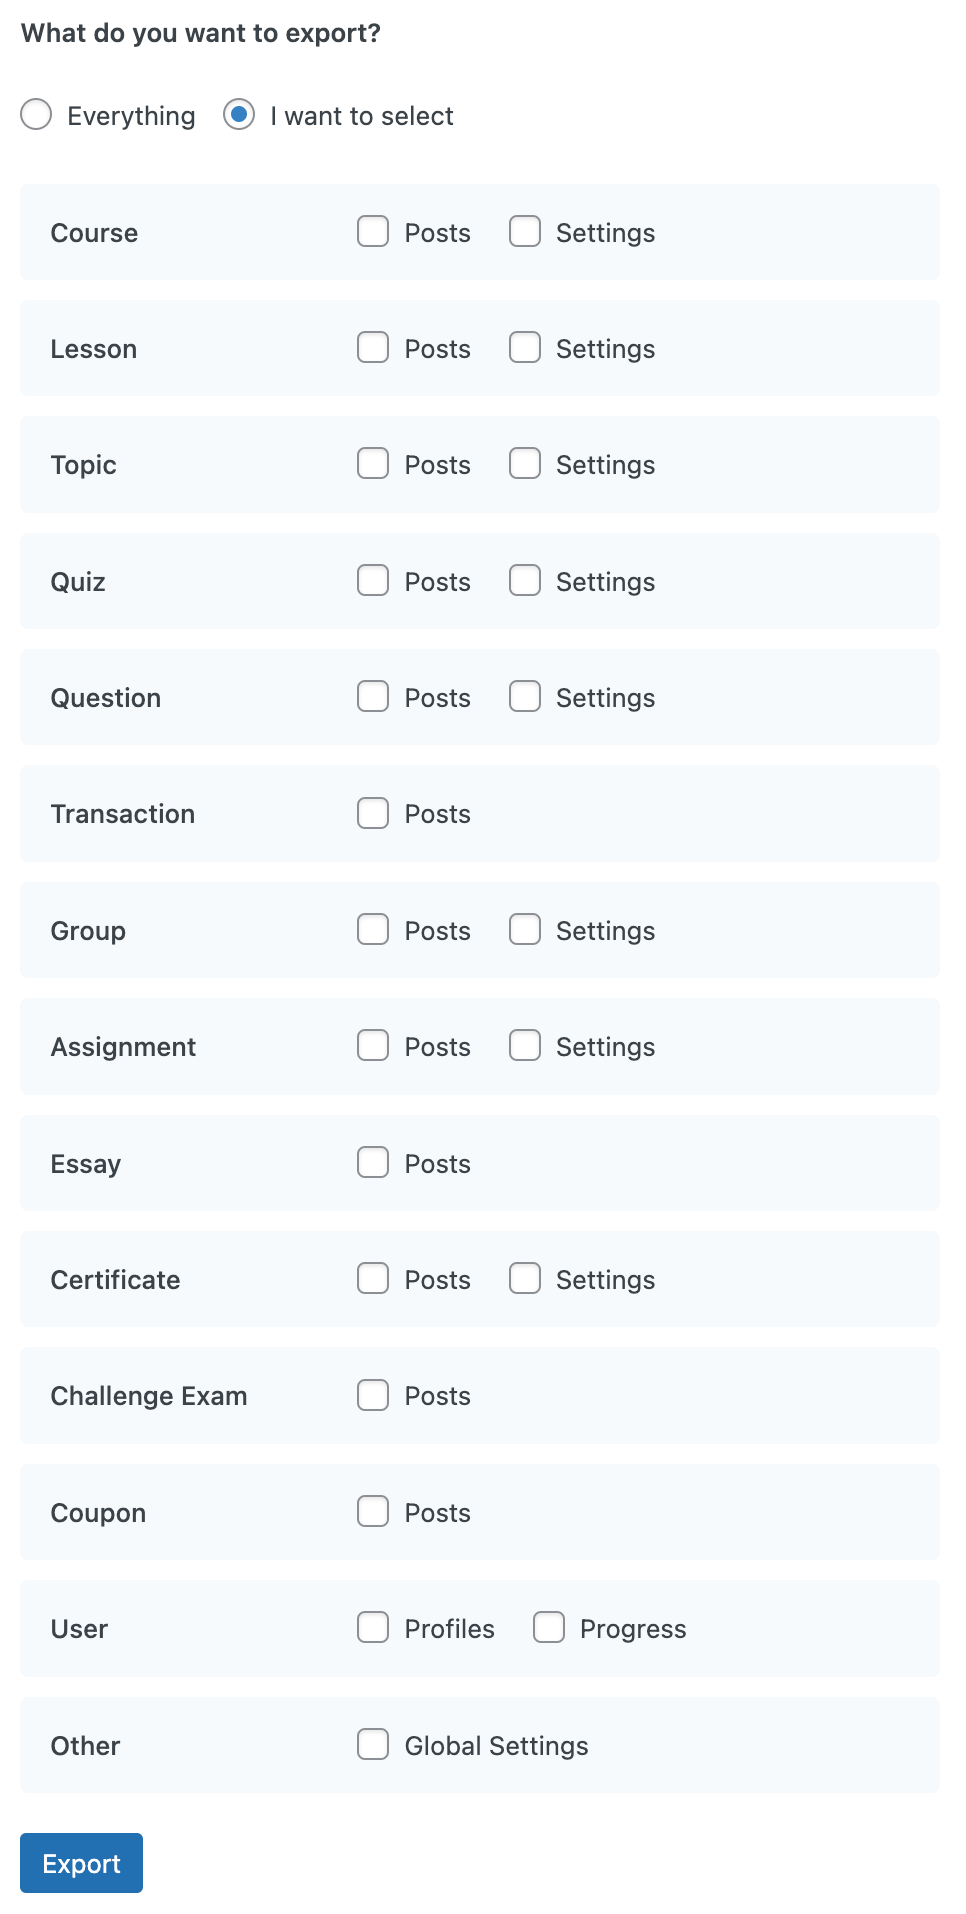
If you are wanting to transfer your data into another LearnDash install, you can choose to either export everything or the different post types and/or their relevant settings for that post type.
Selecting the Everything option, upon clicking Export you’ll be shown a message about the export processing and to refresh the page to check on the status.

If you want to pick specific post types and their settings, choose the “I want to select” radio box and you’ll be shown the different choices:
Import #
Importing the exported content is simple, on the LearnDash install you want to import the content into, visit the Import/Export page, select the exported content file that you previously downloaded and click the Import button. Similar to the export, you’ll see a message about the import processing and to refresh the page to see the status.

Once the import has completed, the processing message will go away and that is it, you should then be able to see all of the chosen exported content in the new install.
NOTE: Currently, custom taxonomies are not supported in the importer.
Logs #
NOTE: This feature is only available on LearnDash version 4.5.0. Update to the latest version of LearnDash in order to use this plugin. You can find information on how to update here.
Logs is a feature built directly into LearnDash settings to allow you to view and log certain types of actions on your site. This can be helpful when you are debugging problems on your site, or you simply want to see and have a record of the transactions that’s going on on your site as a reference.
The Logs setting can be accessed from LearnDash LMS > Settings > Advanced > Logs.

From here, you can have the option to enable logging for the following events:
Data Importing
Data Exporting
PayPal Transactions
Stripe Connect Transactions
RazorPay Transactions
By default, these settings are all turned off, so you would need to enable them to start the logs. Once enabled, you can select from the dropdown and see the logs that have been recorded.

