

Automate Student Emails with the LearnDash Notifications Add-On

Your learners have probably had this thought before: If I decide to randomly stop taking this course, would anyone notice?
According to the Journal of Educators Online, students most likely drop out of online courses due to a lack of instructor contact and social interaction.
Encourage learners to stay motivated and engaged by automating several touchpoints throughout the course.
When instructors keep in touch with learners, it motivates them to progress and finish through their courses. An automated email communication can keep a student motivated by making them feel that someone is there. The presence of an instructor through with regular checkins after major milestones keeps up that feeling of connection without requiring a ton of extra effort.
LearnDash Notifications Can Help
Work towards motivating your learners with the free LearnDash Notifications add-on. This add-on can send emails to your students after certain actions occur such as completing a course, finishing a lesson, or passing/failing a quiz. You can tailor when these notifications are sent, who receives them, and the message itself.
Here’s a quick overview of how it works:
Install the add-on
In your WordPress admin area, navigate to LEARNDASH LMS > ADD-ONS. Locate the LearnDash Notifications add-on. Click Install Now and Activate Plugin.
Create a Notification
Navigate to LEARNDASH LMS > NOTIFICATIONS. Click the Add New Notification button. There is no limit to the number of notifications you create, but you should give some thought to how much email you are sending your users. Think of when your students need to hear from you the most (such as crossing a certain milestone or when work is past-due).
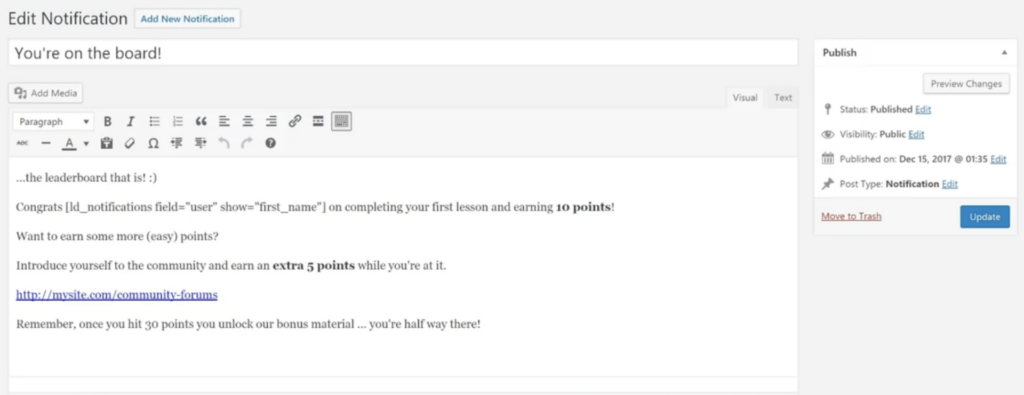
Write your Email
The title of your notification will serve as the email subject line. The content of your notification will be the message you send. You can format text, insert images, and switch from Visual to Text mode. There’s plenty of freedom to customize, but keep in mind the reason why you’re sending. Sometimes short and to the point is the most effective.
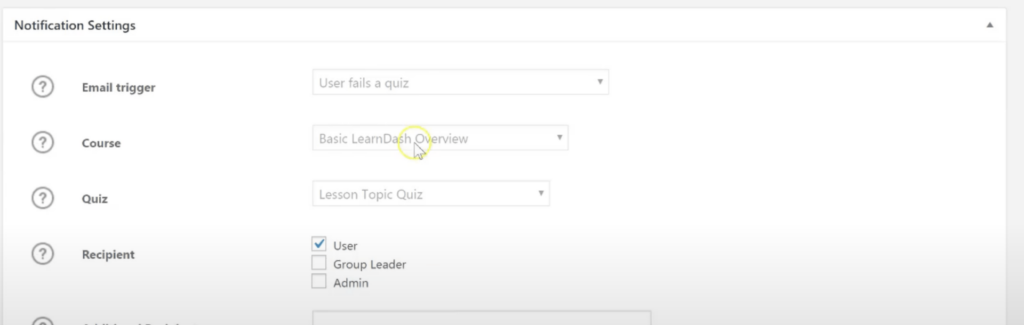
Set the Trigger and Choose Your Recipient(s)
The trigger is what causes your email to send. The default delay setting is 0 days, which means the email will be sent as soon as the trigger fires. You can specify a different number if you’d like your email to go out on a delay.
Your email can go out to all users, group leaders, or admins, or a combination of the three. This lets you customize notifications for each individual group. For example, say you oversee several Group Leaders who teach individual courses. You can send them a separate email acknowledgement when learners pass their courses.
Publish the Notification
The final step is to click the Publish button to make your notification live. Once a notification has been published, you will not be able to edit the trigger. (You can always make a new notification with the same copy if you need to change the trigger settings.)
Want more? Our Support Doc will walk you through all the nitty-gritty steps of creating automated emails with the LearnDash Notifications Add-On.
Learn more about how automated notifications work in our webinar replay:
Don’t Have LearnDash Yet?
Give LearnDash a try with our two demo options. In the course creator demo, you can create notifications and set triggers in a unique sandbox environment. Plus, any work you start in the demo can be carried over to your LearnDash account, including our new LearnDash Cloud option.
Get started today.
Explore what course creation looks like on your own demo site.


