
The LearnDash WooCommerce integration is very popular because it provides an enormous amount of flexibility for selling your courses. WooCommerce works with dozens of payment gateways, and there’s a WooCommerce extension for nearly any type of ecommerce functionality you can think of. If you’re looking to build the ultimate ecommerce experience, our WooCommerce integration might be your best option.
While it is incredibly powerful, WooCommerce does come with more of a learning curve than most other plugins & integrations. We’ll walk you through the LearnDash integration step-by-step below, but there is much more to WooCommerce that we won’t be covering in this article.
Table of Contents
Why Use WooCommerce with LearnDash?
You should consider using the WooCommerce for LearnDash integration if:
✅ you want full control over the checkout experience
✅ you want to customize the My Account area for your customers
✅ you sell physical products, in addition to your courses
✅ you want to control the emails sent to course enrollees
✅ you want to offer coupons & discounts
✅ you want to sell courses in a bundle (multiple courses for a single price)
✅ you want to use a payment gateway other than Stripe, PayPal or 2Checkout
WooCommerce offers a wide variety of extensions to power your ecommerce store. If you’d like to use any of this additional functionality, consider using the LearnDash WooCommerce integration to sell your courses.
You might not want to use WooCommerce for LearnDash if:
❌ you’re looking for a quick & easy setup
❌ you have a small number of courses or a small audience that you manage manually
Walkthrough Video
Requirements
Before you can use this integration, you will need:
- LearnDash
- WooCommerce (version 3.0 or above)
Installation
Option 1: Add-ons Menu (requires an active LearnDash license)
- In your WordPress admin area, navigate to LEARNDASH LMS > ADD-ONS
- Locate the WooCommerce for LearnDash add-on
- Click Install Now
- Click the Activate Plugin button

Option 2: Manual Upload
- Download the plugin file (must be logged in to download)
- In WordPress, navigate to PLUGINS > ADD NEW
- Click Upload Plugin
- Browse for the
.zipfile you downloaded in Step 1 - Click Install Now
- Click Activate Plugin
Set Up Your Product
The integration connects your WooCommerce products with LearnDash courses, and helps the two systems communicate with each other. There’s some setup involved in both plugins, but we’ll walk you through the steps.
NOTE
If you’re new to WooCommerce, consider reviewing their Getting Started guide before continuing. We’ll show you how to create a simple product, but there are many other setup options to consider.
WooCommerce Settings
IMPORTANT
Don’t skip this step! This is required for the integration to work.
When someone buys your course using WooCommerce, LearnDash needs to know who to provide course access to. Therefore, LearnDash needs a specific user within WordPress to enroll into the course. This is why Guest Checkout must be disabled, and your users must create an account when using this integration.
- Navigate to WooCommerce > Settings
- Click on the Accounts & Privacy tab
- Uncheck the box next to “Allow customers to place orders without an account”
You also need to make sure customers have the ability to create an account during checkout.
- On the same page, check the box next to “Allow customers to create an account during checkout”
- Be sure to Save Changes at the bottom
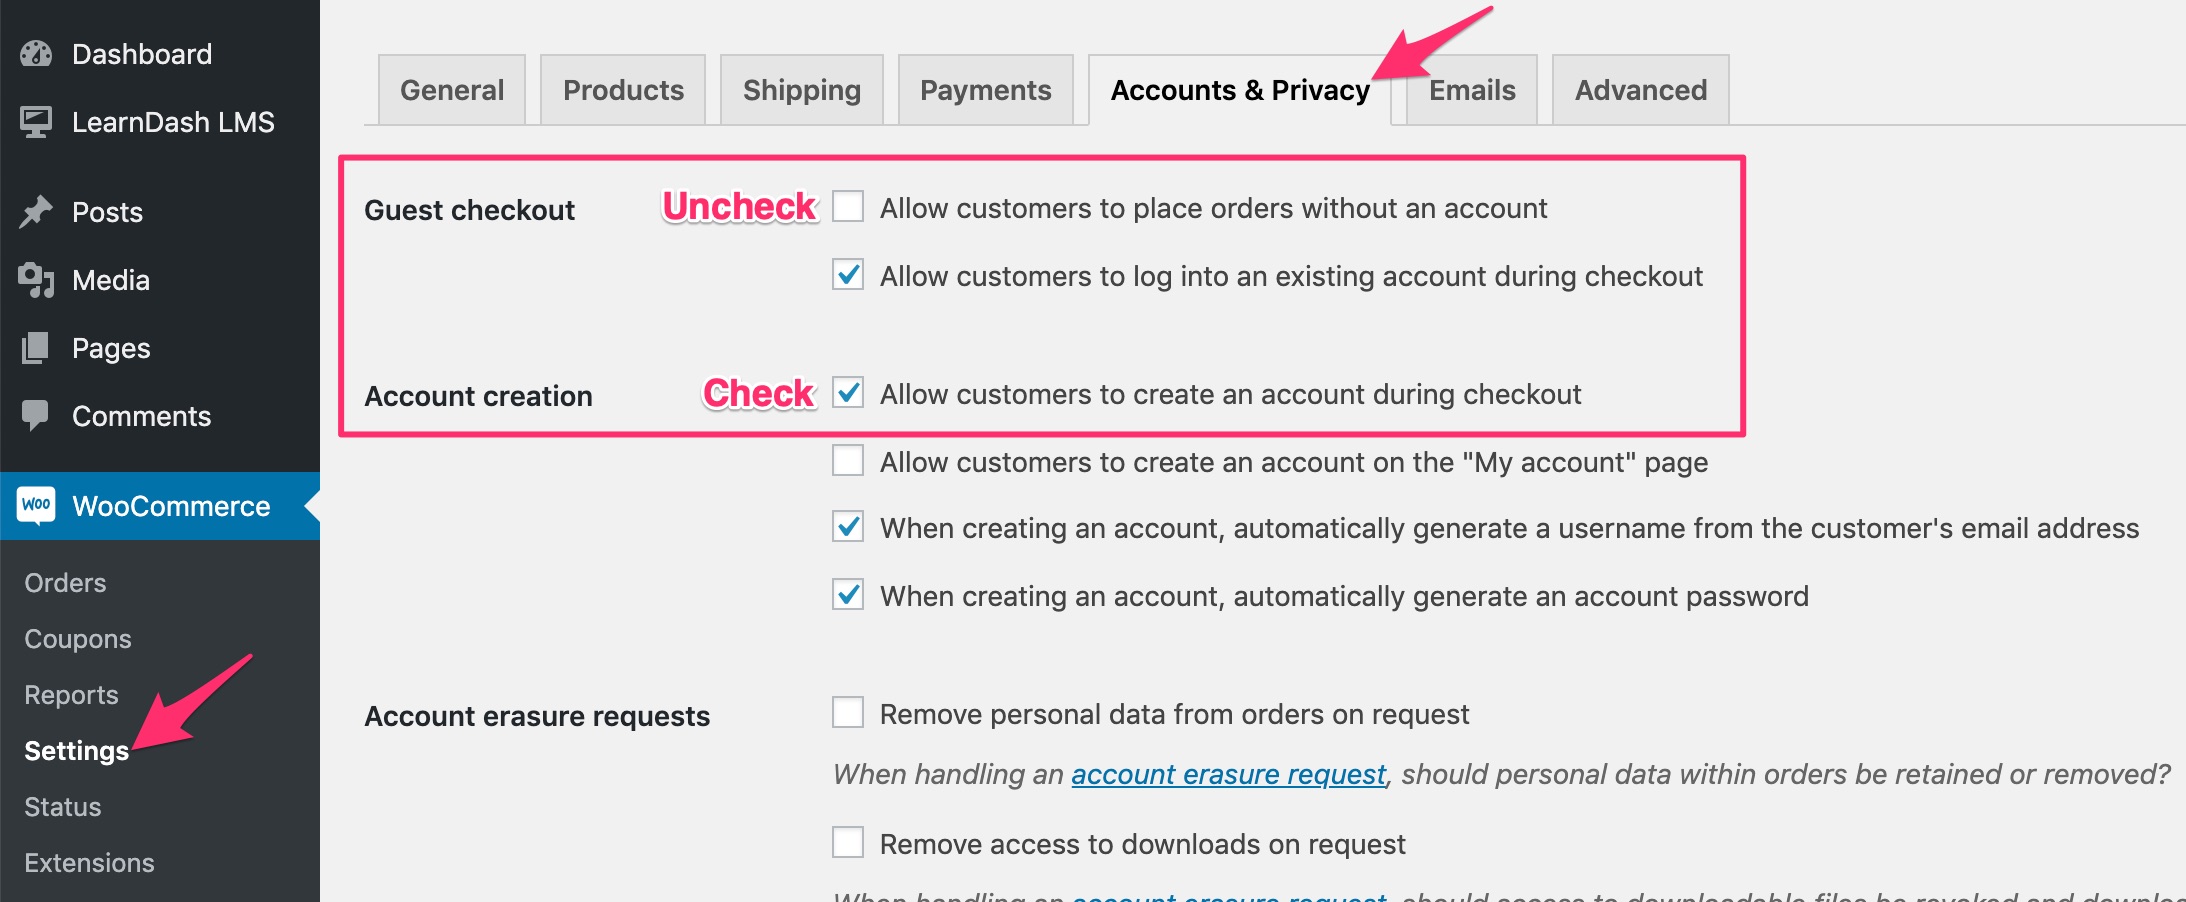
You can still enable “Allow customers to log into an existing account during checkout,” so existing users can return and purchase additional courses.
Create a Product & Assign Your Course
Now let’s create a product in WooCommerce.
- Navigate to PRODUCTS > ADD NEW
- Fill in the appropriate information for your product (see WooCommerce’s guide on adding products)
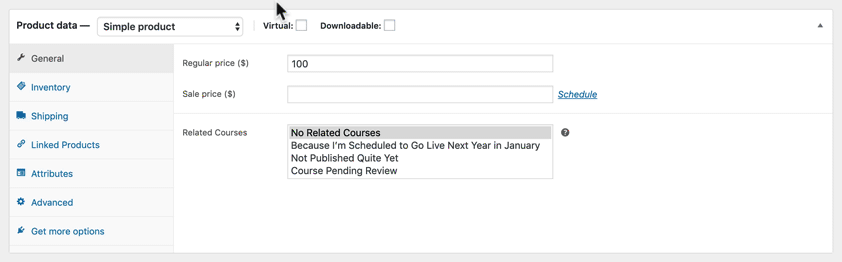
- Scroll down to the Product data section
- Next to the Simple Product dropdown menu, check the box for Virtual
- Open the Simple Product dropdown menu and choose Course
- Next to Related Courses, click on the course you’d like to associate with this product
- Be sure to publish or update your product when you’re finished
BUNDLE COURSES
You can bundle multiple courses and sell them with a single WooCommerce product. Hold down the SHIFT key when selecting courses from the list.
IMPORTANT
When adding five or more courses to a single product, course enrollment process is done in the background and you will need to set up a cron job. To set up a cron job please follow these steps.
Set Up Your Course
After your product is set up in WooCommerce, you’ll need to make a few adjustments to your LearnDash course.
- Navigate to LEARNDASH LMS > COURSES
- Click on the course that corresponds with a WooCommerce product
- Click the Settings tab at the top
- Under Course Access Settings, look for Access Mode
- Set this to Closed
- In the Button URL field, enter the URL to your WooCommerce product page

Now when people visit your course page, the “Take this Course” button will send them to the corresponding WooCommerce product page, where they can add the product to their cart & complete the checkout process.
TIP
Want to speed up the checkout process? You can add the product to a user’s cart AND redirect them to the cart page all in one step. In the Button URL field, enter your cart URL (typically /cart/), followed by ?add-to-cart=123, where 123 is the WooCommerce product ID. The entire URL will look like this:
https://yoursite.com/cart/?add-to-cart=123
Additional Tips
While not required, there are a few additional things you might want to consider with your setup.
Add a Purchase Note
WooCommerce has a built-in field called “Purchase Note.” This note is shown to the customer in a few places, after a successful purchase:
- On the purchase confirmation page
- In the customer’s receipt email
Consider using this field to provide instructions or next steps for taking your course, along with a link to the course page.
- Navigate to PRODUCTS
- Click on the product you’d like to add a purchase note for
- Scroll down to the Product data section
- Click on the Advanced tab
- Enter your instructions and/or a link to your course
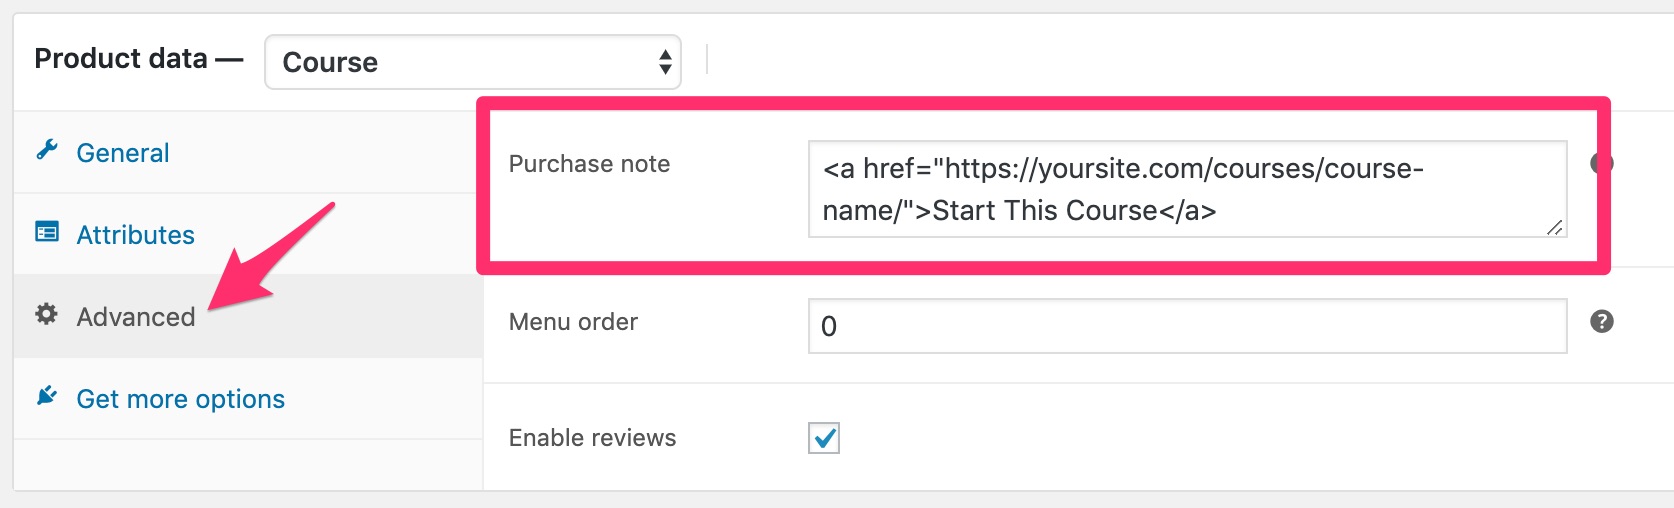
This field accepts HTML. Here’s an example to create a link to your course. Replace the URL with the URL to your specific course.
<a href="https://yoursite.com/courses/course-name/">Start This Course</a>Use Different Product Types
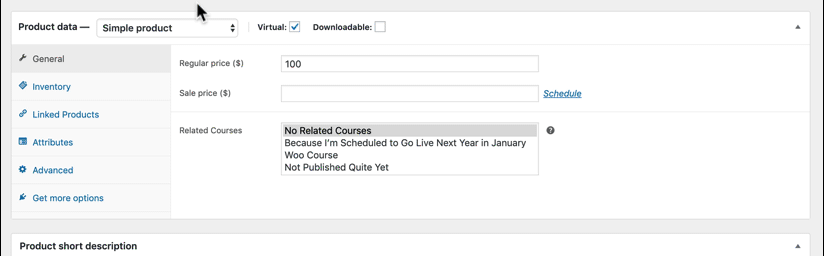
Did you know you can leverage any WooCommerce product type while keeping the course association?
Learn more about different product types and why you might want to use them.
- On your WooCommerce product, scroll down to the Product data section
- Select the Course product type & choose your Related Course (as outlined above)
- Now you can switch your product type, and WooCommerce will remember your course selection in the background
Post-Purchase Redirect
After purchase your customers are sent to the WooCommerce purchase confirmation page. You can bypass this step and send customers directly to the course instead by following the steps in this video:
Using WooCommerce with LearnDash
In this webinar we go through the set-up steps and key considerations when configuring WooCommerce with LearnDash.
Selling Course Subscriptions
In this webinar we cover how to configure subscription products in WooCommerce, and then how to link those subscriptions to LearnDash courses.
Sales Funnel Using CartFlows
To optimize the checkout process for conversions, we recommend using the free CartFlows plugin which has an integration with LearnDash. The video below details the configuration.
The User Experience
NOTE
When testing, we recommend visiting your site in a private browsing window. To see how the integration works, you should be logged out of your account (by default, administrators will already be enrolled in the course).
Once everything is set up correctly, there are a few ways in which potential customers can go through the process of purchasing one of your courses. (These are only some examples. This list is not meant to be exhaustive.)
- They could start on your main shop page, which is automatically created by WooCommerce, and contains a list of all of your products, including all the ones you’ve set up for your courses.
- They click on a product to visit the product page.
- Add the product to their cart.
- Finish the WooCommerce checkout process.
- If online payment was successful, they are automatically enrolled to the corresponding LearnDash course.
- They might land on your LearnDash course page first.
- They click the “Take this Course” button to visit the product page.
- The remaining steps are the same as above.
- You can create a separate landing page using the new WordPress editor (Gutenberg), a page builder, or even a completely different platform outside of WordPress.
- Include a “Buy Now” button on your landing page.
- Use the link to directly add the course to the WooCommerce cart, bypassing the product page altogether (ex:
https://yoursite.com/cart/?add-to-cart=123) - The remaining steps would be followed to complete checkout through WooCommerce.
Course Access & Auto-Enrollment
The WooCommerce integration has some built-in logic that helps auto-enroll users into the corresponding LearnDash course. Here’s how it works:
NOTE
This assumes you’re using version 1.5.0.14 or higher of the WooCommerce for LearnDash add-on.
Which WooCommerce payment methods can enroll users into a LearnDash course?
All payment methods can be associated with a LearnDash course, including both online & offline payments.
- Online Payments: Stripe, PayPal, and all other WooCommerce payment gateways
- Offline Payments: Direct bank transfer (BACS), Check payments, and Cash on delivery (COD)
Are users auto-enrolled into the course after completing checkout?
- Online Payments → Yes
The WooCommerce order status is set to Completed. - Offline Payments → No
The WooCommerce order status will remain Pending.
If a user pays online, but the order also contains a physical product the WooCommerce order status will remain Processing. The order status needs to be set to Completed for the user to be enrolled in the course.
When do offline payment customers receive course access?
As soon as you change the WooCommerce order status to Processing.
Can I auto-enroll users who choose an offline payment method?
Yes. To do this, you can use the Autocomplete WooCommerce Orders plugin, which allows you to automatically mark ALL orders as Completed, regardless of online or offline payment. Be careful with this option, as it could grant a user access to a course before you receive payment.
Retroactive Course Access Tool
If some WooCommerce customers have purchased courses and haven’t been properly granted access, you can use the retroactive course access tool. The tool will scan all WooCommerce orders, looking for Completed orders that are connected to a LearnDash course, and automatically enroll the associated users. It will also unenroll the customers who should no longer have course access.
Example Situation: If you add a course to a WooCommerce product after someone has already purchased the product, running this tool will find that user and give them access to this new course you just added.

- Navigate to WOOCOMMERCE > STATUS
- Click on the Tools tab
- Scroll down until you see “LearnDash retroactive course access”
- Click the “Check LearnDash course access” button
The tool works for regular WooCommerce course products, as well as those using the WooCommerce Subscriptions extension.
Access Removal on Expiration
By default, if you have subscriptions set up with your WooCommerce and LearnDash setup, the associated course access will be removed as soon as the subscription expires. However, there is a way to disable this default behavior.
Example Situation: You may want the course access to be an add on to another (main) product that you sell with the course. In that case even if the subscription expires (i.e. access to the main product), you may want to keep the course access for the customer. In that situation, you want to check this option to disable the course expiry option and ensure that your customer will still have access to the courses even after their subscription expires.

- Navigate to WOOCOMMERCE > SETTINGS
- Click on the “Subscriptions” tab
- Scroll down to where it says “LearnDash”
- Check the box to disable Access Removal on Expiration
- Click “Save Changes”
This tool only works with the WooCommerce Subscriptions extension and the LearnDash WooCommerce addon installed.
FAQ
Why wasn’t a user created & enrolled into the associated course(s) after purchase?
Auto-enrollment should work as stated above. Please update to version 1.5.0.14 or higher of the WooCommerce for LearnDash add-on.
Which payment gateways can I use with WooCommerce?
WooCommerce offers the most payment gateways of any LearnDash integration—several of them are free, while others come with an additional fee. Check out all WooCommerce payment gateways here.
Does this integration support manual/offline payments?
It does, but manual/offline payments work a bit differently than online payments. Please see the section above.
Can I use Variable Products in WooCommerce with the integration?
Yes. However, when you set a product as a Variable Product, the associated course is not retained in the WooCommerce settings. You will need to set it for each variation.
Can I create bundles & memberships with WooCommerce and LearnDash?
Yes. This article explains how you can do this in more detail.
Is this integration compatible with WooCommerce Subscriptions?
Yes. Learn more about the WooCommerce Subscriptions extension.
A user’s course access is automatically removed if you provide them a refund or they cancel their subscription.
Why doesn’t “Add to Cart” translate to my language when the integration is active?
This is due to a setting in the integration. To resolve this, edit the WooCommerce product and once the LearnDash course is selected, go back to the Simple Product dropdown menu (the course selection will be saved) – then click Update.
Why is it showing two transactions on my records?
For LearnDash 4.5.0 or newer, there will be 2 transaction record per single transaction. This is normal and your user will not be charged twice for each transaction. See our explanation on this on our Payment Transaction Records documentation.