How To Create a Course Using a Blog
If you have a blog, then you know how much work is required to continually write useful articles. It takes a great degree of dedication to run a blog properly, which is why many people avoid it altogether.
One reason people become demoralized with blogs is because they feel that the initial value of their articles is lost shortly after it is released.
There are multiple reasons why this is not true.
Sure, the biggest ‘push’ for any article you write is going to be in the first few days of posting. However, that post will live forever – you will still see visitors months (often years) later to that same post. It won’t be the same amount of traffic, but it still is providing value to someone.
But there is another reason why your articles are valuable.
As you built up a good number of posts, you actually develop course content! By compiling related articles and making a few minor editorial adjustments, you can create a cohesive course to offer to your visitors in exchange for their email address – helping you to create an extremely valuable asset.
What’s the catch? Well, there are two things you have to consider:
- Which topic people would want to know about
- How to create a course easily
If you have Google analytics or something similar installed on your site, you’ll be able to see which articles generate the most interest. This may be a good place to start as you investigate course ideas.
Once you have identified the articles for the course, it’s time to build it. This sounds time-consuming, but you can actually do this in just a few minutes using LearnDash!
How To Create a Course From Your Existing Blog Content
First, install and activate LearnDash (don’t have it? Go get it now!)
Next, install and activate the free Post Type Switcher plugin.
In LearnDash, go to the COURSES menu and click ADD NEW. Here you will create your course description. For more information on how to set this part up, see this article on the support site.
Now it’s time to create lessons. Go to the articles you have selected for your course. You will notice that the Post Type Switcher plugin has added a new drop-down menu, as shown below:
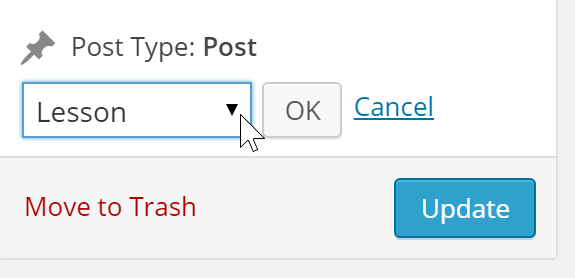
Using this menu, select ‘Lesson’ and click UPDATE. Your blog post has just become a LearnDash Lesson!
At the bottom of the blog post (now lesson), select the course that you created in step #3 and click UPDATE again.
That’s it! You now have a feature-rich course available for registrations by leveraging content you already created!
If you have additional questions about creating your own courses, do send us a note and we would be happy to discuss your ideas!

Justin Ferriman
@LearnDashLMS